Applications
The Settings section in Dengage offers a variety of tools to manage and integrate different aspects of your account. One important feature is the ability to integrate applications within the platform. This functionality provides an overview of existing integrations, including details such as name, status, type, and the date of the most recent update. Additionally, you can easily create new application integrations to expand the capabilities of the platform. This integration feature helps streamline your operations and improve the flow of data between Dengage and other systems.
The Applications section within Settings > Integrations allows users to integrate iOS, Android, Huawei, and Website applications with the platform during the initial setup. Multiple websites or applications can be connected here.
Adding a New Application
To begin integration, click the New button and follow these steps:
Select Type
- Choose the application type:
- iOS
- Android
- Huawei
- Website
Even if Android and Huawei share the same code base, their tokens differ, requiring separate entries. Similarly, they have distinct application IDs during integration.
Creating an iOS Application

Creating an iOS Application
To integrate an iOS application, follow these steps:
Click the New button and select the type as iOS.
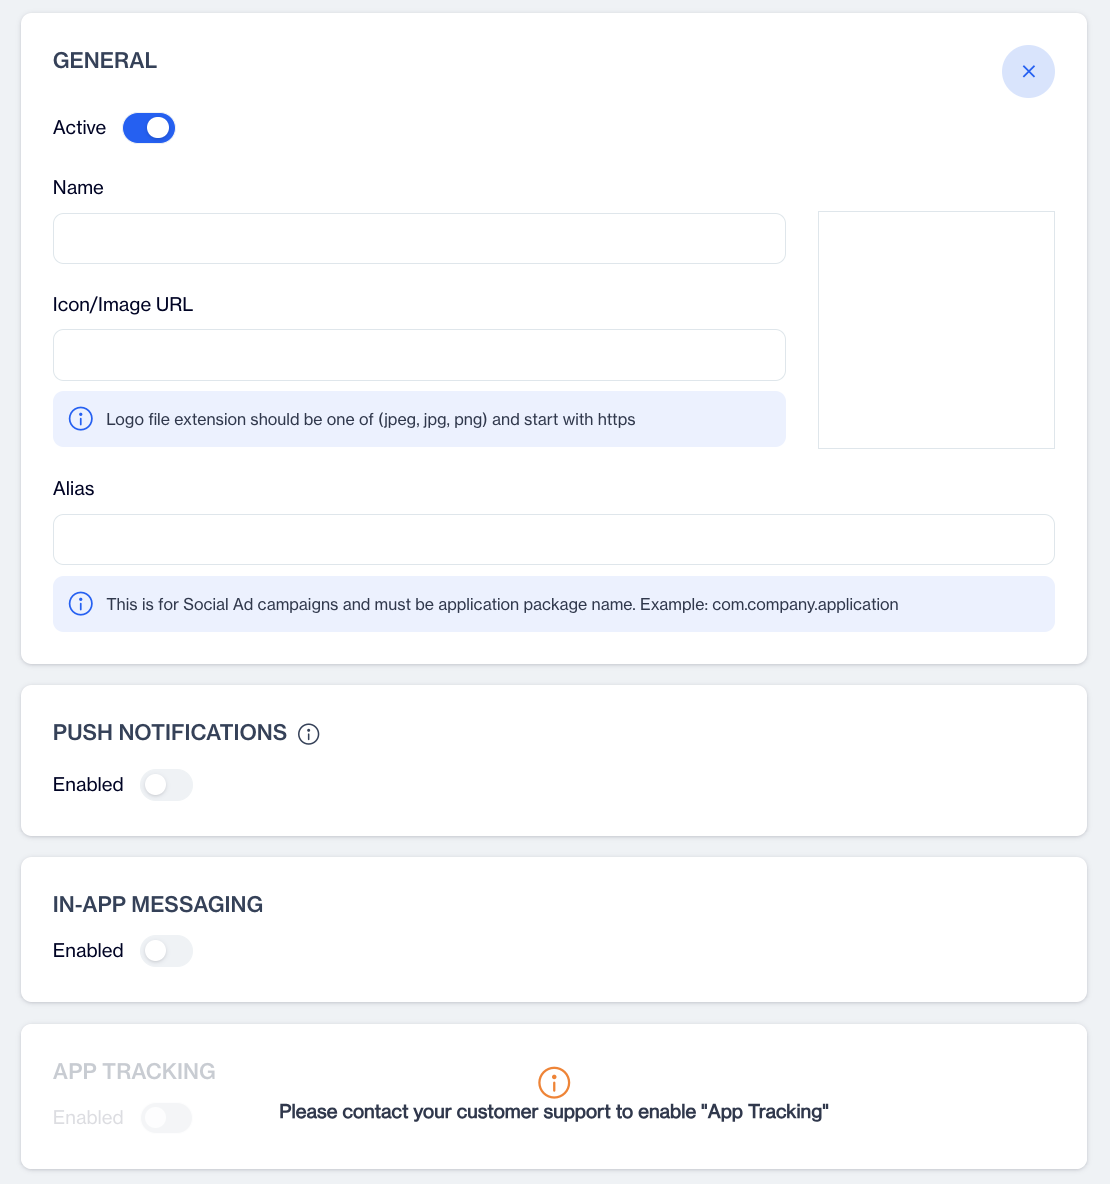
General Information
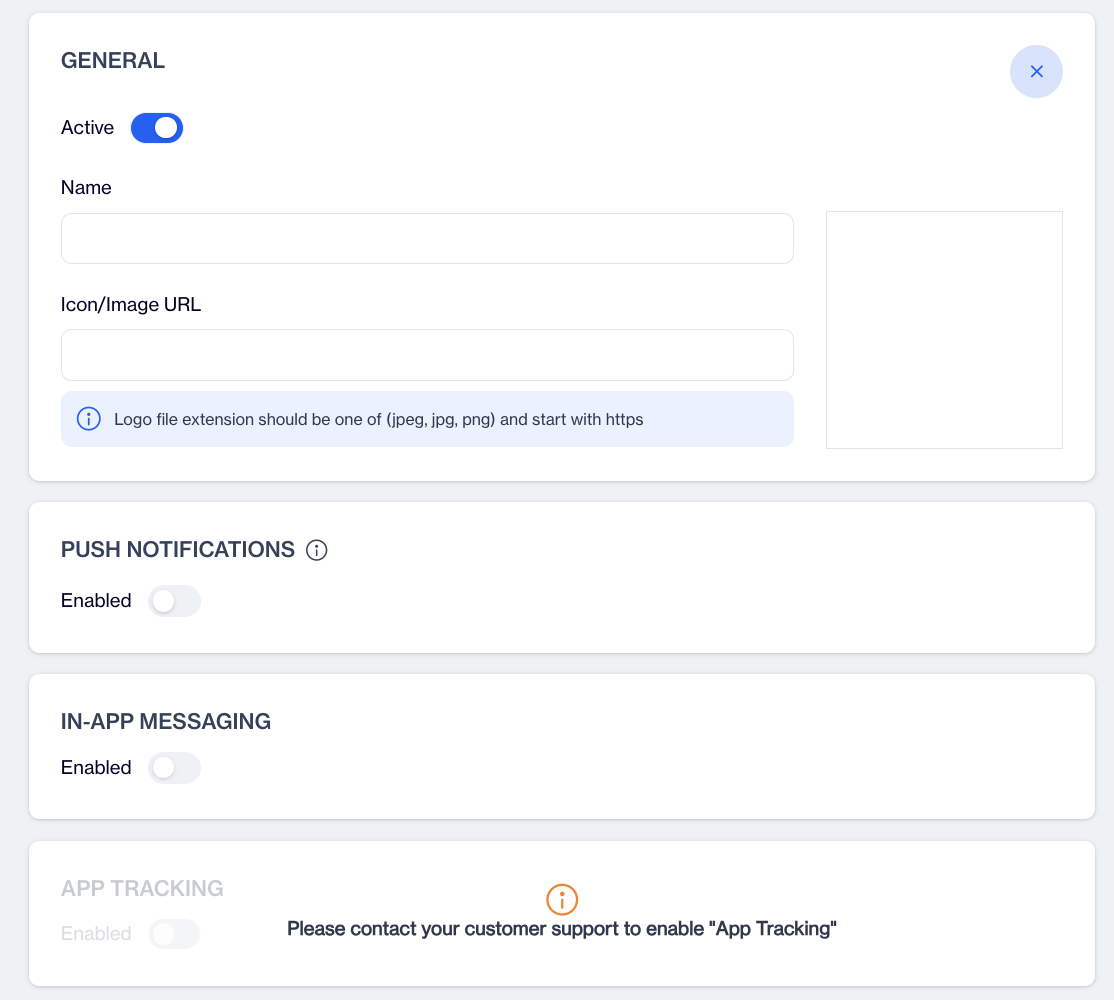
- Active: Use the toggle to activate or deactivate the application.
- Name: Enter the application name.
- Icon/Image URL: Provide the URL for the application icon/logo. The file must be in JPEG, JPG, or PNG format and start with https.
- Alias: Enter the application ID (e.g., 123456). This is required for social ad campaigns.
Push Notifications and In-App Messaging Toggles
- Enable or disable these features as needed.
- When Uninstall Tracking is enabled under Push Notification, a silent push is sent at night. Devices that have uninstalled the app are detected during the nightly calculation, and their statuses are updated accordingly.
Uninstall Tracking
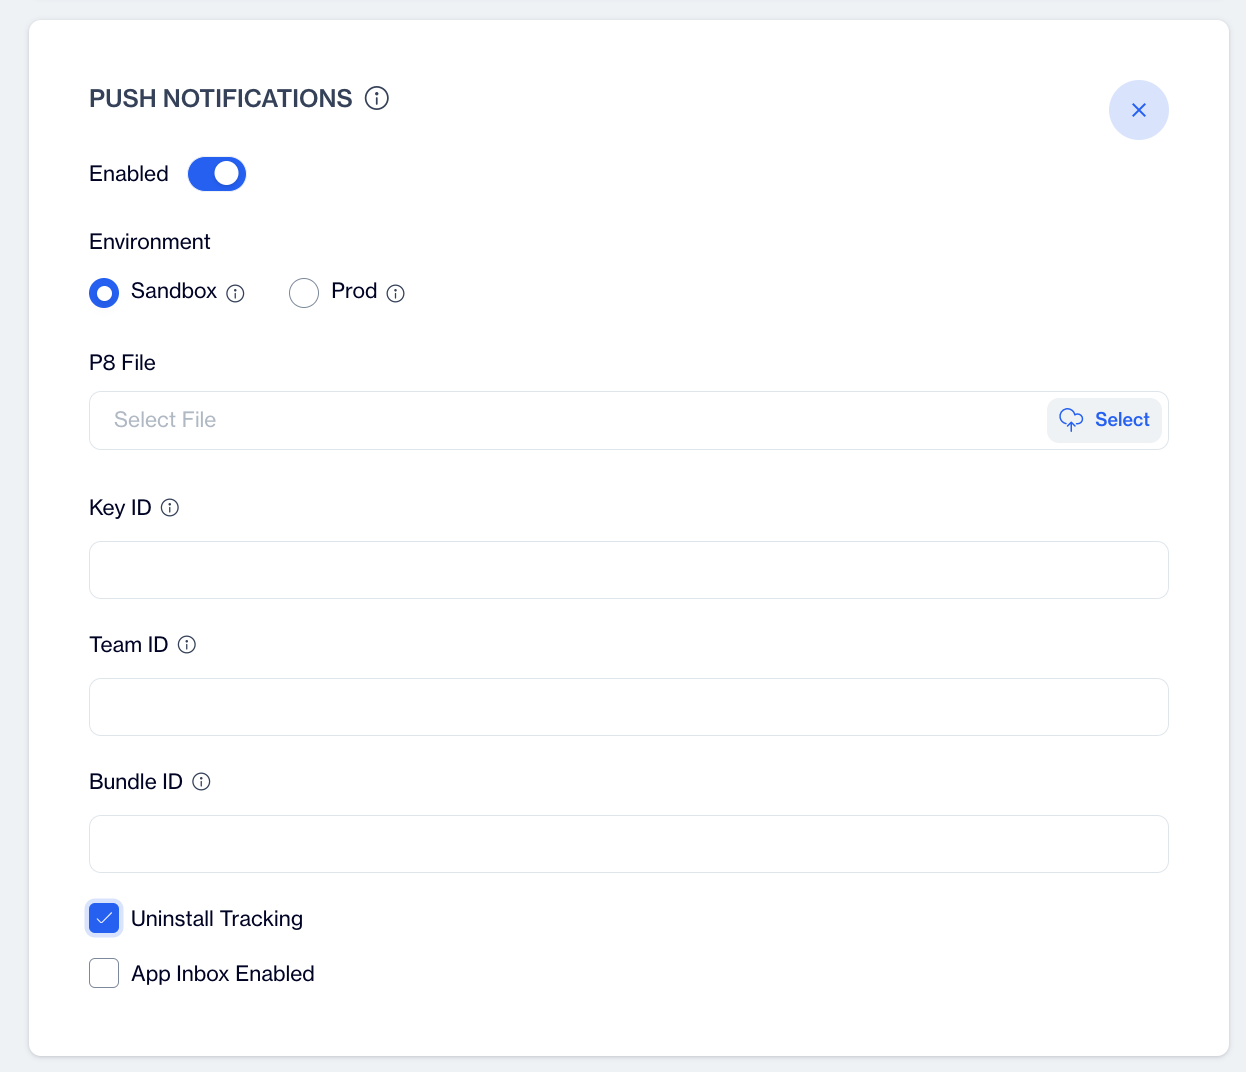
Push Notifications Setup
- Enabled: Toggle to activate push notifications.
- Environment:
- Choose Sandbox for apps downloaded from Xcode.
- Choose Prod for apps downloaded from App Store, TestFlight, Firebase, etc.
- Required Information:
- P8 File: Upload the private key file obtained from the Apple Developer portal.
- Key ID: Enter the identifier of the private key from the Apple Developer portal.
- Team ID: Provide the organization identifier (also called the Prefix or App Prefix) from the Apple Developer portal.
- Bundle ID: Enter the App ID or Bundle Identifier. This is used to map to the apns-topic HTTP header for targeting the specific application.
In-App Messaging
- The In-App Messaging section provides options to configure messaging frequency and intervals.
- Configuration Options:
- Enabled: Toggle to activate in-app messaging for the application.
- Minimum Interval for Fetching Messages:
- Specify the time interval for fetching new messages.
- Minimum Duration Between Displaying Messages:
- Set the minimum duration between consecutive message displays.
Additional Toggles
- Uninstall Tracking: Enable to track app uninstalls using silent push notifications.
- App Inbox Enabled: Enable to allow notifications to appear in the app inbox even if undelivered.
Editing an Existing iOS Application
When editing an existing iOS application by clicking on it, users will not see sensitive information such as IDs. These details, including the P8 File, Key ID, Team ID, and Bundle ID, must be re-entered. Ensure you have the required information readily available before making edits.
Creating an Android Application
Creating an Android Application
To integrate an Android application into the platform, follow these steps:
1. Click the New Button
- Navigate to the Applications section under Settings > Integrations.
- Click the New button and select the type as Android.
2. General Information
- Active: Use the toggle to activate or deactivate the application.
- Name: Enter the name of the application.
- Icon/Image URL: Provide the URL for the application icon or logo. Ensure the file format is JPEG, JPG, or PNG and that the URL starts with https.
- Alias: Enter the application ID (e.g., 123456). This ID is essential for social ad campaigns.
3. Push Notifications
- Enabled: Toggle to activate push notifications.
- Cloud Messaging Credentials: Upload the required JSON file for Firebase to enable push messaging capabilities.
- Uninstall Tracking: Toggle to enable tracking of app uninstalls via silent pushes.When Uninstall Tracking is enabled under Push Notification, a silent push is sent at night. Devices that have uninstalled the app are detected during the nightly calculation, and their statuses are updated accordingly.
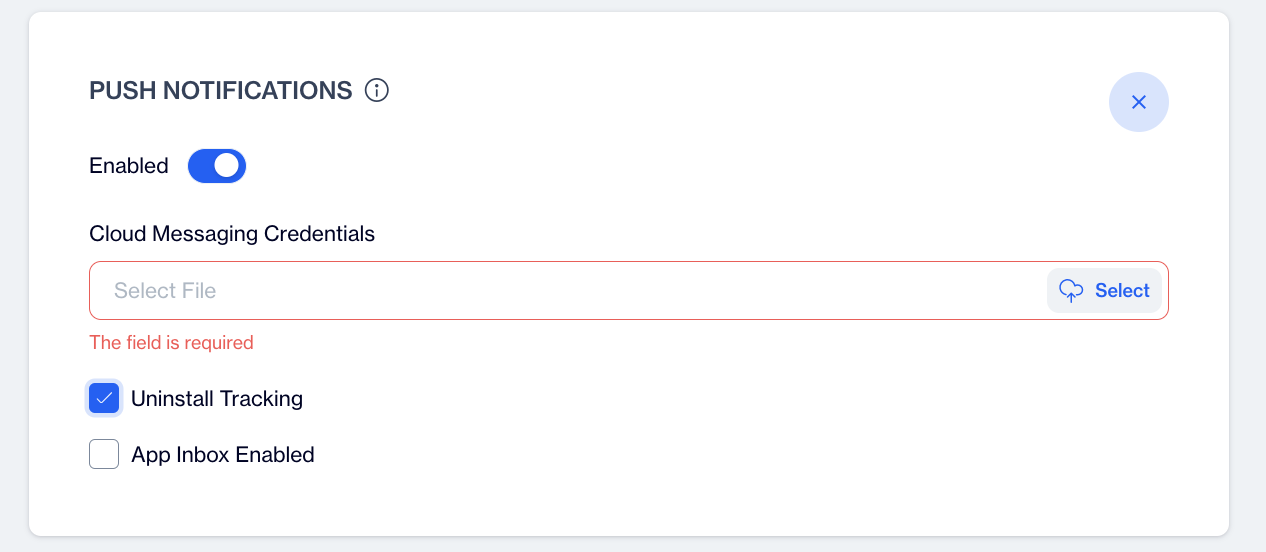
Uninstall Tracking
- App Inbox Enabled: Toggle to allow push notifications to be stored in the in-app inbox, even if not delivered.
4. In-App Messaging
- Enabled: Toggle to activate in-app messaging.
- Minimum Interval for Fetching Messages: Specify the time (in minutes) between consecutive message fetches.
- Minimum Duration Between Displaying Messages: Set the time (in seconds) required between showing two messages.
5. App Tracking
This feature allows the platform to retrieve and send a list of installed packages from the operating system backend. It can be used to track whether specific applications are installed on a device.
- Enabled: Toggle to activate app tracking.
- Alias: Enter a unique alias for the application.
- Package Name: Enter the package name of the application to track.
- Add: Click this button to add more fields for entering additional aliases and package names. You can track up to 10 packages.
By following these steps, you can successfully integrate your Android application and configure it for advanced tracking and messaging capabilities.
Creating a Huawei Application
Creating a Huawei Application
To integrate a Huawei application into the platform, follow these steps:
Click the New Button
Navigate to the Applications section under Settings > Integrations.
Click the New button and select the type as Huawei.General Information
- Active: Use the toggle to activate or deactivate the application.
- Name: Enter the name of the application.
- Icon/Image URL: Provide the URL for the application icon or logo. Ensure the file format is JPEG, JPG, or PNG and that the URL starts with https.
Push Notifications
Enabled: Toggle to activate push notifications.
App ID: Enter the Huawei App ID for push notifications.
App Secret: Enter the Huawei App Secret.
Uninstall Tracking: Toggle to enable tracking of app uninstalls via silent pushes.When Uninstall Tracking is enabled under Push Notification, a silent push is sent at night. Devices that have uninstalled the app are detected during the nightly calculation, and their statuses are updated accordingly.
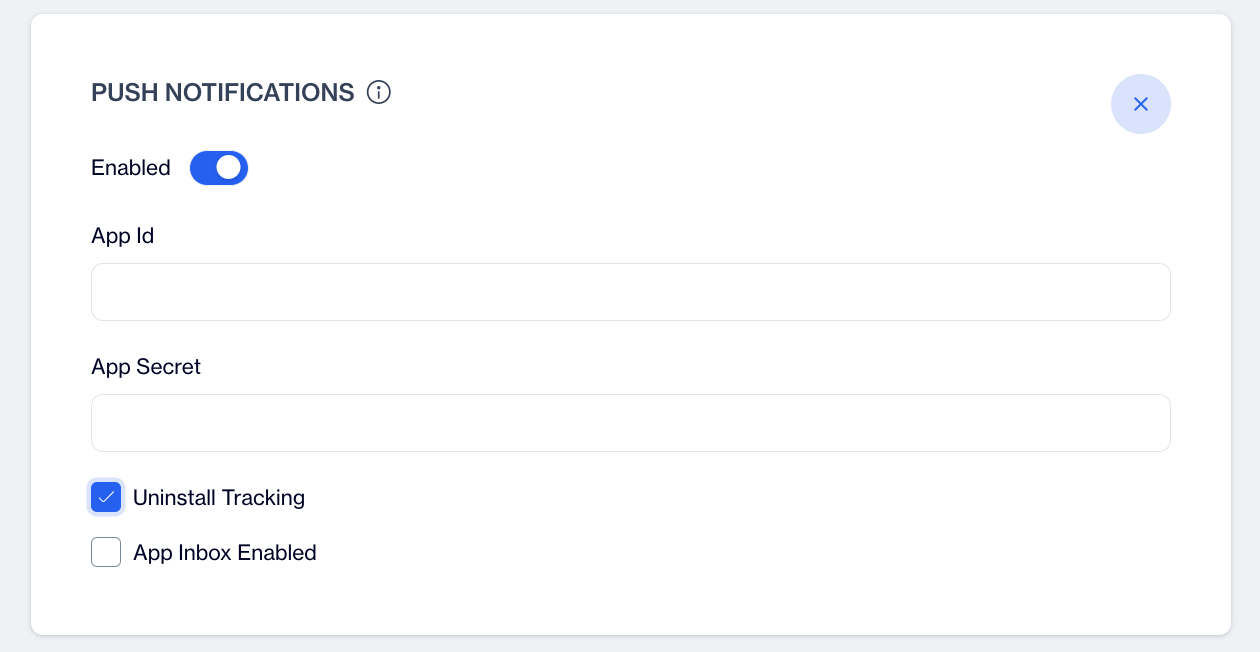
Uninstall Tracking
App Inbox Enabled: Toggle to allow push notifications to be stored in the in-app inbox, even if not delivered.
In-App Messaging
- Enabled: Toggle to activate in-app messaging.
- Minimum Interval for Fetching Messages: Specify the time (in minutes) between consecutive message fetches.
- Minimum Duration Between Displaying Messages: Set the time (in seconds) required between showing two messages.
App Tracking
This feature allows the platform to retrieve and send a list of installed packages from the operating system backend. It can be used to track whether specific applications are installed on a device.- Enabled: Toggle to activate app tracking.
- Alias: Enter a unique alias for the application.
- Package Name: Enter the package name of the application to track.
- Add: Click this button to add more fields for entering additional aliases and package names. You can track up to 10 packages.
By following these steps, you can successfully integrate your Huawei application and configure it for advanced tracking and messaging capabilities.
Creating a Web Application

Creating a Web Application
This guide provides step-by-step instructions for integrating a web application into the platform, focusing on key sections such as General, Push Notifications, On-Site Messaging, and Advanced Settings.
- Go to Settings > Integrations > Applications.
- Click the New button.
- From the list of application types, select Web.
This will open the setup screen for your new web application.
1. General Section
In this section, you define the basic settings for your web application.
Active
Toggle this option on to activate the application, or off to deactivate it. Only active applications can collect and process data.
Name
Enter a descriptive name for your web application. For example, Main Website or Shop Portal.
Icon/Image URL
Provide the URL of the icon you want to display for this application.
- The icon must be square, with a minimum size of 256px.
- The URL must start with HTTPS.
- This icon appears in push notifications and permission prompts.You can use the same icon here or upload a different one when sending notifications.
Site Domain URL
Enter the main website domain where the SDK will be used. This tells the system which site your web application belongs to.
Example: If your website is https://www.example.com , enter that as the Site Domain URL.
Add Domains
Click Add Domains to open the Extra Domains field. Here, you can add additional domains where the same web application should run.
Example: You might add shop.example.com or blog.example.com as extra domains.
Sync Data Between Domains
Enable this option if you want to share user data across all added domains.
When enabled:
- The main (parent) domain stores the data.
- Other extra domains can access the same data.
- The system keeps data synchronized between domains through the SDK.
This allows a visitor to move across multiple domains (for example, www.example.com, shop.example.com, blog.example.com) while keeping a single Device ID.
Important:
- One of the domains must be the parent domain.
- The other domains should be subdomains of the parent.
- Synchronization works only if domains are hierarchically related.
This setup ensures a seamless experience and accurate data tracking across your connected websites.
2. Push Notifications
Push notifications let you engage users directly through their browsers.
Enable Push Notifications
Toggle Enabled to activate push notifications. The platform uses the Web Push API to deliver notifications across supported browsers.
Custom Permission Prompt Type
Choose between Pop-up or Sticky Bar to control how the notification request appears to users. Preview each type in the Settings menu.In Settings, you can also adjust position, layout, main color, title, font size, and other styling options.
Try to Show Native Permission Prompt if Browser Allows
When enabled, the SDK will first try to display the browser's native notification prompt. If the native prompt isn't available, the custom prompt will be shown instead.Push notifications often involve a two-step process, first the custom prompt, then the native browser prompt. The browser's native permission is required for push notifications to be granted. Even if the custom prompt is shown and accepted, the user isn't officially subscribed until the native prompt is approved.
Show Permission Prompt on Page Load
Enable this option to automatically display the permission prompt when the page loads.
When this option is turned on, the SDK automatically manages how and when permission prompts are shown based on the rules you define below.
If this option is turned off, you can choose to display the permission prompt manually whenever you prefer.For example, by using the Show Native Prompt or Show Custom Prompt methods.
- Show Permission Prompt X Seconds After Page Load: Set a delay (in seconds) before showing the permission prompt after the page has loaded.
- At Least X Sessions Required to Show Permission Prompt: Define the minimum number of user sessions before the prompt appears.
- Wait at Least X Hours/Days Before Showing Again (Ignored): Set how long to wait before showing the prompt again if the user ignored it.(took no action)
- Wait at Least X Hours/Days Before Showing Again (Denied): Set how long to wait before showing the prompt again if the user denied it.(clicked a "No Thanks" or similar button).
Show Information Popup if Notifications Are Blocked
Enable this option to display an information popup when the user has blocked notifications in their browser. This popup only informs the user that notifications are currently disabled, it cannot request permission again.
Its purpose is to remind users who previously denied permission and guide them to re-enable notifications manually from their browser settings.
You can adjust its behavior with the following settings:
- Show Information Popup X Seconds After Page Load: Set a delay (in seconds) before showing the popup after the page loads.
- Wait at Least X Hours/Days Before Showing Again: Define how long to wait before showing the popup again after it has been displayed.
- Show Information Popup at Most X Times: Limit the total number of times the popup is shown to the same user.
Show Welcome Notification on Permission Is Allowed
The welcome notification is an automatically generated message sent by the SDK once permission is granted. Enable this option to automatically send a welcome notification to users immediately after they grant notification permission.
This helps confirm that the permission was successfully allowed and gives users a friendly first interaction with your site's notifications.
You can define the title, message, and link of the welcome notification in the related settings.
Safari
For Safari browsers, additional configuration is required because older Safari versions do not support the standard Service Worker system used for web push notifications.
To enable push notifications for Safari users:
- Upload a P12 File and its Private Key obtained from your Apple Developer account.
- Provide the Website Push ID associated with your Safari web push certificate.
These credentials allow the platform to send push notifications specifically to Safari users.
3. Onsite Messaging
On-site messaging allows you to display personalized messages or campaigns directly on your website.
Enable Onsite Messaging
Toggle this option to activate or deactivate on-site messaging for your web application.
Wait at Least X Minutes Before Refetching Flow On-Site Messages
Define how long the system should wait before checking again for new on-site messages from Flow campaigns.
When a visitor comes to your website, the system queries the server to see if there are any Flow-based on-site messages available for that user.
This setting controls the interval between these checks - the minimum value is 4 minutes.
After Showing an On-Site Message, Do Not Show for X Seconds
Specify the minimum time in seconds to wait before displaying another on-site message after one has been shown.
This setting helps prevent messages from appearing too frequently, ensuring a better user experience and avoiding a spam-like impression even when multiple campaigns are active.
Use Messaging-Based Popup Rendering
Enable this option if your website's Content Security Policy (CSP) blocks data: URLs in the frame-src directive. When this occurs, the default popup rendering method may not work properly.
If enabled, the SDK will use an alternative method by loading a static HTML file and sending the popup content through postMessage.
This option is generally recommended to remain disabled, but it can be used when your site's CSP restrictions prevent standard popup rendering.
4. Advanced Settings
The Advanced Settings section provides options to customize and control how the SDK behaves on your website. These settings are generally for specific use cases or advanced configurations, allowing you to track additional data, manage SDK initialization, control navigation events, and handle device-to-contact mapping.
Use Site Variables
The Site Variables feature allows tracking important data from your website, such as the total price or number of items in a shopping basket. You can select the data source from the dropdown menu, such as the Google Tag Manager Data Layer or custom JavaScript code. For each variable, you can add a descriptive name or text to clarify what it tracks.
For example, on an e-commerce site, you might track the total basket amount or the number of items in the basket. These values can be read using a variable from Google Tag Manager or a custom JavaScript code. While this feature is useful for tracking basket data or similar metrics, it is less commonly used with the newer SetCart feature, which is an advanced version of this functionality.
Custom JavaScript Code
This option allows adding custom JavaScript that runs once every time the SDK is installed. Clicking Edit opens a code editor where the code can be entered. This can be used to run specific codes on each SDK load or to implement custom behaviors tied to the SDK. This feature is not generally recommended, as it can be difficult to manage and control, and is rarely needed. It should be used only for very specific custom requirements.
Print to Browser Console
This option controls how much logging information is displayed in the browser console.
The SDK records logs related to different events and states during operation.
From the dropdown menu, you can choose how detailed the console output should be:
- All: Shows all logs.
- Errors & Warnings: Shows only errors and warning messages.
- Errors: Shows only error messages.
- No Log: Disables all console logging.
The default setting is Errors.
Initialize SDK on Install
The SDK starts in three main steps when it runs on a page:
- Injection: The SDK code is inserted into your website. This loads the required scripts that allow it to function properly.
- Install: The SDK installs its components and prepares the environment.
- Initialize: The SDK begins its actual operations, such as displaying on-site messages or requesting push notification permissions.
When Initialize SDK on Install is enabled, the SDK automatically performs these steps and starts working as soon as the page loads. This is the default and recommended option for most users.
If this option is disabled, the SDK will not initialize automatically. This is useful if you prefer to control when it starts working, for example, after a user action or at a specific point in your website flow. In that case, you can manually start it using the provided initialize method.
Tip:
- Keep this enabled if you want the SDK to initialize automatically when the SDK is installed.
- Disable it only if you plan to manage when the SDK initialize manually.
Trigger Navigation on Initialize
Enable this option to automatically trigger a navigation event when the SDK initializes.
In this context, a navigation represents a user's activity on the website, such as opening a page or clicking a link to move to another section. Many SDK features (like showing on-site messages or requesting push permissions) depend on these navigation events to start.
When Trigger Navigation on Initialize is turned on, the SDK automatically assumes that a navigation has occurred when it initalizes and triggers related actions internally.
If your setup already uses the public method setNavigation to manage navigation events manually, you should keep this option disabled to avoid duplicate triggers.
If you do not use setNavigation, you should enable this option so that the SDK can handle navigation triggers automatically.
In short:
- Enabled: The SDK automatically triggers navigation events after initialization.
- Disabled: You control navigation events manually using setNavigation.
Allow Connecting Multiple Contacts to Single Device
This setting determines whether a single device can be linked to multiple contacts. Normally, when you visit a website, the SDK generates a Device ID to identify you anonymously. If you log in with an email, a Contact Key is assigned to that Device ID. In the old system (V1), logging out and then logging in with a different email would link the new contact to the same Device ID. In the newer system (V2), each Contact Key gets a separate Device ID, so logging in with a different email after logout generates a new Device ID.
Enabling this option allows a single Device ID to be connected to multiple contacts. By default, it is disabled to ensure more accurate event and session data, but it can be enabled if required for integrations or specific workflows.
Related Articles
General
The "Onboarding and Setup" section of our product documentation provides users with a detailed guide through the initial configuration and deployment of our platform. This section is meticulously designed to ensure a smooth start, offering ...Integrations
The Dengage Platform offers extensive integration capabilities, allowing for seamless connectivity with a variety of systems and applications. This flexibility enhances the platform's utility in diverse operational environments. The Dengage Platform ...Mobile SDK
Should we duplicate our events within the mobile app if it essentially serves as the mobile view of our website? If your mobile app mirrors the layout of your website for mobile screens and the event capturing script has already been incorporated ...App Uninstalls
This section provides insights into user retention and engagement by analyzing installs, uninstalls, and communication performance. It identifies behavioral trends, evaluates campaign impact, and uses predictive analytics to help businesses enhance ...Display Messages with Static Source
The Display Messages with Static Source feature determines how the iframe content is loaded for on-site messages. There are two supported methods for iframe integration depending on whether this feature is enabled or disabled. How to Access and ...