Flow Components
Flow Overview
Flow is a visual campaign builder that helps you create customer journeys step by step.You can use Flow Components to build these journeys by dragging and dropping of various flow nodes to design complex customer interactions.
When Can You Use Flow?
Flow helps you create personalized, cross-channel customer journeys that adapt to each user’s needs. You can use Flow at any stage of the customer journey to build stronger relationships and drive engagement. For example:
- Welcoming New Users: Send a series of helpful messages to introduce your product and keep new users interested.
- Bringing Users Back: Reach out to users who haven’t been active in a while with personalized messages to get them re-engaged.
- Rewarding Loyalty: Send special offers or thank-you messages to loyal customers to keep them coming back.
Advantages of Flow
Flow offers several benefits to help you engage users more effectively:
- Delivers Personalized Experiences: Use customer data to send the right message at the right time, across multiple channels.
- Supports Omnichannel Engagement: Communicate with users through email, SMS, push notifications, and more.
- Improves User Retention: Keep users active and interested by staying relevant and timely.
- AI-Powered Optimization: Test, learn, and improve your flows using AI to find what works best for your audience.
Steps to Create Flow
In the Dengage dashboard, go to the Campaigns section on the left menu and select Flows. Creating a journey involves the following main steps:
1. Setting up a Flow
Start by entering the basic details and settings for your Flow. This defines how and when your campaign will run.
- Choose Flow Type: One-time or recurring
- Name Your Campaign: Enter a clear, descriptive name
- Select a Folder: Organize your Flow in a folder
- Add Tags (Optional): Label related Flows for easy tracking
2.Set a Schedule
- One-Time: Set a specific date and time
- Recurring: Set start date, end date (or never), and intervals
3.Configure Audience
- Select your target audience via Segment, Predefined Segment, Table, Remote Segment, or Tag
- Exclude segments, campaigns, or send lists (optional)
- Enable a control group to measure performance (optional)
4.Add Flow Nodes
Design your customer journey using nodes:
- Drag and drop nodes onto the canvas
- Use different node types:
- Action Nodes: Email, SMS, Push, etc.
- AI Nodes
- Decision Nodes
- Integration Nodes
5.Publish a Flow
- Activate the Flow to start executing the campaign logic
6. Monitor the Flow
- Track performance using flow statistics
- Optimize results based on insights
Flow Listing
The Flows Listing screen provides a centralized view of all campaign flows created within the platform. Users can access and manage both one-time and recurring flows, filter them by ownership, folders, or tags, and review their statuses and performance metrics. This screen helps streamline flow management by offering quick insights and access to editing or monitoring options.
Flow Listing
To access the Flows Listing screen, go to Campaign > Flows.
Once you're on the page, you will see two main tabs: One Time and Recurring, each representing different flow types with their own data and structure.
Shared Listing Features
The Flows Listing screen provides a set of shared filtering tools in the left-hand panel that help you efficiently organize and access your flows. These features are designed to simplify navigation, improve visibility, and make managing flows across teams or campaigns much easier.
All / Created by Me
Located at the top of the left panel, these options help you filter flows by ownership:
- All: Displays every flow you have access to, including those created by other team members.
- Created by Me: Shows only the flows you’ve personally created, helping you focus on your own work.
Folder Filter
Folders allow you to categorize flows into structured groups for better organization and access.
- View all folders created in your account from the left panel.
- Click on a folder name to instantly filter and display only the flows inside it.
- Create a new folder anytime by clicking the + New Folder button and naming your folder.
Tags Filter
Tags offer a flexible and customizable way to label flows. A flow can have multiple tags, allowing you to group and filter flows across different categories.
- View all existing tags and click on any tag to filter the associated flows.
- Create new tags by clicking the + New Tag button and entering a name.
One Time Flows Tab
This tab displays flows scheduled to run only once. Each flow is shown in a table with the following fields:
| Field | Description |
|---|---|
| Name | The name of the flow as created by the user. |
| Channels | The channels used in the flow (e.g., Email, SMS, Push). |
| Status | Indicates whether the flow is Draft, Cancelled, or Completed. |
| Start Date | The date and time the flow is/was scheduled to start. |
| Sent | Total number of messages sent via the flow. |
| Delivered | Total number of messages successfully delivered to recipients. |
Recurring Flows Tab
This tab displays flows that run on a recurring schedule, based on triggers. The table includes:
| Field | Description |
|---|---|
| Name | The name of the recurring flow. |
| Channels | The channels used in the flow (e.g., Email, SMS, Push). |
| Status | Shows the current status of the flow (Active, Passive). |
| Trigger | Indicates how the flow is initiated: either Periodic or External triggers. |
| Last Run Time | Date and time when the flow was last executed. |
| Next Run Time | Date and time when the flow is scheduled to run next. |
Filter Options – One Time Flows
Use the filter panel to narrow down and manage your flows efficiently. The available filters include:
- Channel: Choose the channel used in the flow: Email, SMS/MMS, Push, In-App, On-Site, WhatsApp, A/B Split
- Export Type: Data Export
- AI Options: Optimize Channel, Optimize Time
- Campaign Status: Filter by current status: Not Started, Running, Draft, Paused, Passive, Completed, Error, Canceled
- Tags: Select from existing tags or search by keyword.
- Date Range: Choose a time frame or select custom dates using the All Times filter.
These filters help you quickly find and manage specific flows based on campaign type, status, or timing.
Filter Options – Recurring Flows
Use the filter panel to narrow down and manage your flows efficiently. The available filters include:
- Channel: Filter by communication channels: Email, SMS/MMS, Push, In-App, On-Site, WhatsApp
- Export Type: Data Export
- AI Options: AI Split
- Campaign Status: Active, Passive
- Tags: Search and filter flows by assigned tags.
- Date Range: Filter by flow creation or schedule using predefined or custom date ranges.
- Last Run Time: Filter flows based on when they were last executed.
Use these filters to quickly locate and manage your recurring flows based on channel type, AI usage, status, schedule, and more.
Flow Nodes
Flow Nodes are the fundamental building blocks of user journeys within the Flow module. Each node represents a step, condition, or action that helps guide users along personalized paths based on their behavior, preferences.
Audience & Schedule
Audience
To configure the audience for your campaign flow, double-click the Audience component. In the modal that appears, you’ll find several tabs for selecting your target audience from different sources.
- Search Bar: Quickly locate specific items within the current tab by typing a keyword. Results update instantly based on item names, so you can skip scrolling through long lists.
- Filter: Refine the list by date. Use the dropdown to select Update Date or Creation Date, then set a time range (e.g., Last 7 Days, This Month) to display only the most relevant items.
Below is an explanation of each tab and when to use them:
Segment
The Segment tab displays dynamic segments that you’ve already created within the platform. For instance, if you’ve created a segment for “Users who viewed a product but didn’t purchase within the last 3 days,” this segment will be listed here. This is ideal for scenarios like abandoned cart follow-ups, re-engagement campaigns, or product view retargeting.
Predefined Segment
The Predefined Segment tab offers ready-to-use audience groups that are automatically created by the system. These segments are based on commonly used criteria and require no setup from your side. They are perfect for quick targeting when you don’t need to customize logic. Examples include “SMS reachable contacts,” “Contacts with active email,” “Users whose birthday is in a certain month,” or “Web push clickers.” Since the rules behind these segments are fixed, they help you save time when launching straightforward campaigns.
Table
The Table tab allows you to choose from your existing data tables such as the Master Contact Table or Master Device Table to define who should receive your campaign. These tables hold the main contact or device information in your system. Once you select a table, you can apply additional filters to narrow your audience.This option is useful when your targeting criteria depend directly on detailed data fields in your contact or device structure.
Remote Segment
The Remote Segment tab lists audience segments whose data resides in external SQL databases but can be used within the platform. These segments are created by running SQL queries on the remote database, and the resulting data can then be used as an audience in your campaigns. This allows you to leverage external data sources directly for targeting without manually importing them into the platform.
Tag
The Tag tab lets you target users based on specific tags that have been added to them. For example, if someone signs up for a summer campaign or becomes a VIP customer, they can be given a tag like “Summer2025” or “VIP”. Later, you can select this tag to send them a special message. This is a quick and easy way to reach specific groups based on their actions or status.
Exclusions & Control Group
Exclusions When the Exclusions toggle is turned on, the Add Exclusion button becomes available. Clicking this button opens a dropdown menu where you can choose from the following options: Exclude Segment, Exclude Remote Segment, Exclude Campaign, or Exclude Send List. This allows you to remove specific groups from your target audience. You can add multiple exclusions to refine your audience more precisely.
Exclusions
Control Group When the Control Group toggle is turned on, you can define the percentage of your audience that will be randomly excluded from receiving the campaign. These contacts form the control group and will be used for later evaluation of your campaign’s effectiveness. By default, the control group size is set to 10%, but you can adjust this percentage as needed.
Control Group
Insights
Once you have successfully defined your Audience segment, the platform offers valuable insights into your targeted group. By clicking the Calculate button, you will gain access to data showing the number of individuals within your audience who are reachable through each specific communication channel. This feature provides a clearer understanding of your potential reach, enabling you to tailor your campaign strategies more effectively.
Tips
You can select only one segment as your audience.
- If you need to target multiple segments, create a new segment that combines the criteria you want.
- To combine two existing segments, go to Segments > Filters and use them as filter criteria.
If you choose the Master Contact, Master Device, or a Sendable table as your audience, you can further refine it with additional filters:
- Click Manage Filters.
Manage Filters
- In the modal, click Add Filter.
- Select a Column, choose the Operator, and enter a Value.
Table Filter
- To add more than one condition, repeat step 3 and set the logic for combining filters.
- Click Save.
These steps help you fine-tune your audience for more precise and effective campaign targeting.
Schedule
The Schedule section controls when your flow will start and (if applicable) repeat.
One-Time Campaigns
For one-time campaigns, you can set the schedule in two places:
- Settings Screen – Schedule Options
- Now — Starts the campaign immediately after publishing. If you publish at 14:00, the campaign will go live right away.
- Scheduled — Lets you set a future date and time, such as 2025-08-11 00:02, so the campaign launches exactly at the chosen moment, like midnight on a holiday.
- Flow Canvas – Schedule Node Once the flow is created, you can open the Schedule node to adjust the start time without returning to the Settings screen. A campaign initially planned for Monday can easily be moved to start on Wednesday at 09:00 directly from here.
Recurring Flows
For recurring flows, the schedule is also set in two places:
- Settings Screen – Schedule Options
- Trigger Periodically — Activates the recurrence feature.
- Start Date — Choose Now to start immediately or set a specific date and time, such as 2025-09-01 08:00, to align with a campaign launch.
- End Date — Select Never to keep it running indefinitely, or choose an end date like 2025-12-31 23:59 to stop automatically.
- Recurring Periods — Click Add to open the Recurring Settings modal and define the pattern: daily, weekly, monthly, or yearly. This can be set to run every Monday at 10:00, or on the 1st of each month at midnight.
- Flow Canvas – Recurring Node After the flow is created, you can open the Recurring node to adjust the recurrence pattern directly from the canvas. A flow initially set to run daily can be changed to every Friday at 17:00 without editing the settings screen.
Action Nodes
Action Nodes are used to send messages, update user information, or perform specific tasks during a user's journey. These nodes help you interact with your users at the right time and through the right channel—whether it's an email, a push notification, or even a message on WhatsApp. You can drag and drop these nodes into your flow to build meaningful communication steps.
Action Nodes
Types of Action Nodes
| Node Name | Description |
|---|---|
| Sends an email to users using your selected template. | |
| SMS | Sends a text message to users. You can define the message content. |
| Push Notification | Sends a push notification to users’ mobile devices. You can customize the content. |
| In-App | Displays a message inside your app. |
| On-Site | Shows messages or actions (like pop-ups or banners) on your website based on the user’s journey. |
| Sends a message through WhatsApp. | |
| A/B Split | Splits users into different paths to test which version of a message or journey performs better. |
| Export | Exports user data at a specific step—such as contact details or engagement metrics—for use outside the platform. |
| Update Tag | Adds or updates tags for users. Useful for organizing or targeting users later based on behavior. |
| Update Contact | Updates contact details or attributes, such as status or preferences, based on user actions. |
| Paid Social | Adds or removes users from an advertising network audience, such as Google Customer Match or Facebook Custom Audience |
| Web API | Sends data to or receives data from another system using an API call. |
Email
The Email node is used to define a step in the journey where an email message will be sent to the contacts who reach that point. It allows you to deliver personalized, timely, and targeted communication as part of your campaign.
This node supports the use of email templates and provides options for content selection, audience targeting, and delivery settings.
How to Configure Email Node
To start using the Email node, go to your Flow Canvas and drag the Email node onto the canvas after choosing your audience. Once placed, double-click the node to open its configuration panel. The setup process consists of two main steps: Content and Settings.
Content
In the Content tab, you can rename the node to give it a clear and descriptive name that reflects its purpose in the flow, such as Welcome Email or Cart Reminder. After naming, select an email template from the available content list. Once the content is chosen, click Next to proceed to the settings screen.
Settings
In the Settings tab, you can define how the email will be delivered and tracked. Here, you will see several optional settings. The Remove Duplicate Emails option ensures that the same email address does not receive the message more than once. The Ignore Frequency Capping option allows the system to send the email even if the recipient has already reached their daily, weekly, or monthly message limit, which can be useful for urgent or critical communications. The Ignore Google Analytics option prevents GA tracking parameters from being added to the links inside the email.
You can also configure tracking options in this tab. Enabling Open Tracking lets you monitor if recipients open the email, while Click Tracking provides data on click interactions within the email content.
Another important setting is the IP Pool Name. An IP pool is a group of dedicated IP addresses used for sending your emails. By assigning your campaign to a specific IP pool (for example, bulk-real), you can control how your emails are delivered and manage sender reputation more effectively. If you need a new IP pool added, contact Support to set it up.
The final key option is Contact Extension, which determines which email address field will be used when sending the message. By default, emails are sent to the contact’s primary (default) email address, but you can choose from the following options:
- Send to Default: Sends the message only to the contact’s primary email address.
- Use Contact Extension: Sends the message to a specific extension type (e.g., Work Email or Secondary Email) that you select from the list. Extension types must first be defined in Settings> Campaign Configurations > Contact Extension Types. To create a new type, you can specify a name, choose the channel (Email or SMS/MMS), and set the column order for display.
- Send to First Available: The system checks all available email addresses for the contact (default and extensions) and sends the message to the first valid one it finds. This ensures delivery even if the default address is missing or invalid.
- Send to All: Sends the message to every email address stored for that contact, including the default and all extensions. This guarantees maximum reach but may result in duplicate communication if multiple addresses belong to the same person.
This flexibility helps you ensure your campaigns reach users effectively by targeting their most relevant contact details. For example, business-related notifications can be routed to the Work Email extension, while newsletters can go to the Default email.
Email Settings
When finished, save your configuration and connect the Email node to the next step in your flow.
SMS/MMS
The SMS/MMS node allows you to send a text message to contacts as part of their journey through a campaign. This channel is especially effective for delivering short, time-sensitive, or action-driven messages such as reminders, promotional alerts, confirmations, or limited-time offers.
By incorporating SMS into your journey, you can reach your audience quickly and directly on their mobile devices.
How to Configure SMS/MMS Node
To start using the SMS/MMS node, go to your Flow Canvas and drag the SMS/MMS node onto the canvas after choosing your audience. Once placed, double-click the node to open its configuration panel. The setup process consists of two main steps: Content and Settings.
Content
In the Content tab, you can rename the node to give it a clear and descriptive name that reflects its purpose in the flow, such as Reminder SMS or Promotion Alert. After naming, select an SMS/MMS template from the available content list. Once the content is chosen, click Next to proceed to the settings screen.
Settings
In the Settings tab, you can define how the SMS/MMS message will be delivered.
Optional Settings provide control over message delivery. The Remove Duplicate Phone Numbers option ensures that the same phone number does not receive the message more than once. The Ignore Frequency Capping option overrides daily, weekly, or monthly send limits for a contact, which can be useful for urgent or critical communications. The Ignore Google Analytics option prevents GA tracking parameters from being added to the links inside the SMS/MMS message.
The Contact Extension setting determines which phone number field will be used when sending the message. By default, SMS/MMS messages are sent to the contact’s primary phone number, but you can also choose:
- Send to Default: Sends the message only to the contact’s primary phone number.
- Use Contact Extension: Sends the message to a specific extension type (e.g., Work Phone or Secondary Mobile) that you select from the list. Extension types must first be defined in Settings > Campaign Configurations > Contact Extension Types.
This flexibility ensures that messages reach the most relevant phone number for each contact. For example, urgent delivery confirmations can be routed to the Work Phone extension, while promotional offers may be sent to the Default Mobile number.
SMS/MMS Settings
When finished, save your configuration and connect the SMS/MMS node to the next step in your flow.
Push Notification
The Push Notification node allows you to send a mobile push message to contacts who have your app installed and have granted push permission. This node is ideal for delivering real-time updates, reminders, personalized offers, or any timely information directly to users’ mobile devices as part of their journey.
Push notifications are a powerful engagement tool due to their immediacy and visibility, making them an effective complement to other communication channels in your campaign flow.
How to Configure Push Node
Content
Within the Content tab, you can define the message details, including the node name and the message content. An important step here is selecting the application(s) where the push message will be delivered. To do this, click Select Application, choose the desired app(s) from the list that opens (based on platform and application name), and confirm by clicking Select. Keep in mind that the total audience count may decrease depending on the chosen applications. Once you finalize the content and application selection, proceed by clicking Next to reach the Settings tab.
Settings
The Settings tab provides additional configuration options for fine-tuning message delivery.
- Ignore frequency capping: Ensures that the message is sent even if the user has already reached their daily, weekly, or monthly limit for receiving messages.
- Only select recently used tokens of registered contacts: Restricts message delivery to the most recently active device tokens, reducing the chance of sending messages to inactive devices.If this option is not selected, messages will be delivered to all devices associated with the user.
- Ignore Google Analytics: Excludes Google Analytics parameters from this message delivery.
Expiration & Inbox Options
Further settings let you control how long the message remains valid and whether it is stored in the push inbox.
- Expire In: Defines the time limit for message delivery. If the user is not online within the specified time, the system retries until expiration. The maximum expiry is 28 days.
- Save to Inbox: Allows you to keep important messages accessible in the user’s push inbox.
- Remove from inbox in: Messages can be automatically removed after a set number of days (e.g., 3 days).
- Remove from inbox on: Alternatively, you can specify an exact date and time when the message should be removed from the inbox.
Push Settings
When finished, save your configuration and connect the push node to the next step in your flow.
In-App
The In-App node is used to display messages to users while they are actively using your mobile app. This allows you to communicate in real time with users already engaged with your product. In-app messages are useful for onboarding tips, promotional banners, feature highlights, upgrade prompts, or personalized notifications that appear without interrupting the user experience.
How to Configure In-App Node
Content
Within the Content tab, you can define the message details, including the node name and the in-app message content. An important step here is selecting the application(s) where the message will be delivered. To do this:
- Click Select Application,
- Choose the desired app(s) from the list that opens (based on platform and application name),
- Confirm by clicking Select.
Keep in mind that the total audience count may decrease depending on the chosen applications. Once you finalize the content and application selection, click Next to move to the Settings tab.
Settings
The Settings tab provides additional configuration options for fine-tuning how your in-app message is displayed and controlled.
Optional Settings
- Ignore Google Analytics: Excludes Google Analytics parameters for this send.
Message Expiration & Priority
- Messages expire in: Defines how long the message will remain valid. For example, if set to 3 days, the system retries delivery until the expiration period ends. The maximum expiry is 30 days.
- Priority: Determines the importance of the message (e.g., Low, Medium, or High). Higher-priority messages are displayed before lower-priority ones when multiple messages are eligible.
When to Display
This section controls where the in-app message will appear:
- Show on any page: The message can appear on all application screens.
- Show on specific pages: Restrict message delivery to specific screens.
- You can define conditions using Screen Name [operator] [value]
- Additional filters can also be applied by clicking Add Filters.
Dismiss Behavior
This section defines how the message is dismissed and if/when it can reappear.
- Show once: The message is displayed only one time per user.
- Show every: The message can be repeated at a chosen interval.
- Example: Show every 1 hour(s).
- You can also set a Max dismiss count to limit how many times the user can dismiss and then see the message again.
- Delay: Adds a waiting period before the message appears. For example, if set to 5 seconds, the in-app message will be shown 5 seconds after the user enters the screen.
In-App Settings
When finished, save your configuration and connect the in-app node to the next step in your flow.
On-Site
The On-Site node enables you to deliver personalized messages or interactions to visitors directly on your website. This can include banners, pop-ups, or other UI elements designed to capture attention, prompt action, or guide users through a specific conversion path.
On-site messaging is highly effective for promoting offers, capturing leads, reducing cart abandonment when the user is actively browsing your site.
How to Configure On-Site Node
Content
Within the Content tab, you can define the message details, including the node name and the onsite message content. An important step here is selecting the application(s) where the message will be delivered. To do this:
- Click Select Application,
- Choose the desired app(s) from the list that opens (based on platform and application name),
- Confirm by clicking Select.
Keep in mind that the total audience count may decrease depending on the chosen applications. Once you finalize the content and application selection, click Next to move to the Settings tab.
Settings
The Settings tab provides additional configuration options for fine-tuning how your on-site message is displayed and controlled.
Optional Settings
- Ignore Google Analytics: Excludes Google Analytics parameters for this send.
- Priority: Determines the importance of the message (e.g., Low, Medium, or High). Higher-priority messages are displayed before lower-priority ones when multiple messages are eligible.
When to Display
This section controls where the on-site message will appear:
- Show on any page: The message can appear on all pages of the selected application or website.
- Show on home page: The message is shown only on the home page.
- Show on specific pages: Restrict message delivery to specific pages.
You can define conditions using: Page URL Path [operator] [value]
Additional filters can also be applied by clicking Add Filters.
Dismiss Behavior
This section defines how the message is dismissed and if/when it can reappear.
- Show once: The message is displayed only one time per user.
- Show every: The message can be repeated at a chosen interval. Example: Show every 1 hour(s).
- Max dismiss count: Limits how many times the user can dismiss and then see the message again.
- Delay: Adds a waiting period before the message appears. For example, if set to 5 seconds, the message will be shown 5 seconds after the user lands on the page.
Onsite Settings
When finished, save your configuration and connect the on-site node to the next step in your flow.
A/B Split
This powerful tool is designed to optimize your email, push, and on-site messaging by testing two variants of content in a single one-time campaign. Instead of continuously redirecting traffic, A/B Split works by sending each variant to a small portion of a predefined audience, for best results this audience should be large enough (e.g., at least 100,000 recipients). After the initial send, the system waits for a set evaluation period to measure engagement and conversion rates. Once the winning variant is determined, the remaining audience automatically receives the more effective content. Whether you're fine-tuning emails, personalizing push notifications, or enhancing on-site interactions, A/B Split enables data-driven decisions to boost the success of your one-time campaigns.
Configuration begins by choosing the appropriate channel. Depending on the channel selected, the configuration settings may vary slightly to accommodate specific channel requirements.
A/B Split - Channel
You’re preparing an email campaign to promote your new product launch, but you're not sure which subject line will drive more opens. To find out, you use the A/B Split node in your campaign flow. You set Variant A with the subject line “Introducing Our New Collection – Just Launched!”, and Variant B with “You Asked, We Delivered – Shop the New Arrivals!”.
You configure the test by sending each version to 5% of your audience (5% for Variant A, 5% for Variant B). You then set the remaining 90% to be sent to the winning variant based on open rates. In the optimization section, you enter 120 minutes as the test duration, meaning the system will track which subject line performs better over a two-hour period. After the test ends, the email with the higher open rate will automatically be sent to the remaining 90% of your audience.
This way, your campaign is optimized in real time, and most of your users receive the version that’s proven to work better.
Configuring A/B Test Variants
Configuring A/B Test Variants
Distribution Allocation
- At the top, you'll see green 🟩 and blue 🟦 bars indicating the percentage of your audience that will receive each variant of the contents (Variant A and Variant B). Adjust the percentages as needed, keeping in mind that the remaining percentage (as indicated by "90% goes to winner") will be allocated to the variant that performs the best.
Selecting Content and Setting Distribution for Each Variant
- Identify Variant A 🟩 and Variant B 🟦 , use Select Content button to assign a content for each variant.
- The percentage field allows you to specify what portion of your test audience will receive this variant.
- Use the Change Content button if you wish to select a different content for this variant.
A/B Test Optimization
In this section, you define how the winning variant will be determined.
Winning Variant
- Enter the time (e.g., 120 minutes) in the provided field, after which the system will evaluate the performance and automatically send the winning variant to the rest of the audience.
Data Export
During your journey flow, you can export data seamlessly to a Remote Target. The Data Export node enables you to automatically send data from your journey flow to an external system called a Remote Target.
By using this node, you can ensure your external systems stay updated with the latest information from your journeys, enabling smoother reporting, retargeting, and campaign optimization.
How to Use “Data Export” Node in a Campaign Flow
To use the Data Export node, drag it into your journey at the point where you want to export data.
Note
To use the Data Export node, you first need to define a Remote Target. To do this, go to Settings > Integrations > Remote Targets, click Add, choose the platform you want to export data to, fill in the necessary details, and click Next to complete the setup.
Remote Target
Platform-Specific Requirements
Data export settings may vary based on the platform or product you choose. Each one may require different configurations to ensure the export works correctly. Below, you’ll find a list of supported platforms and the specific setup details needed for each Remote Target.
| Platform/Protocol | Requirements | Available Options |
|---|---|---|
| FTP | Host , port, User Name, Password, Remote Directory | ZIP Compression, Use Passive Mode |
| SFTP | Host , port, User Name, Password, Remote Directory, SSH Key | ZIP Compression |
| FTPS | Host , port, User Name, Password, Remote Directory | ZIP Compression |
| Google BigQuery | Key Json File | |
| Microsoft SQL | Server, port, Database Name ,User Name, Password | |
| Facebook Custom Audience | User Id, Account Id | |
| Google Customer Match | Ad Account Id , User | |
| SalesForce | SalesForce Client Id, SalesForce Client Secret Key. ⚠️ A column name from Master Contact table should be selected | |
| Turkticaret.net | Api Key, Segment Api Key | |
| Turk Telekom | User Name, Password, Segment Api Key | |
| Web API | Base URL, Endpoint, Authentication Type | Enable HTTP/2 (Default 1.1) , Enable compression (gzip) |
| AWS S3 | Bucket Name, Region, Access Key, Secret Key | |
| Oracle | Server IP, port, Database Name, User Name, Password | |
| TikTok | Advertiser Id, Advertiser Name | |
| Amazon Redshift | Server, port, Database Name ,User Name, Password |
To configure the Data Export node, simply double-click on the node to open its settings. Start by selecting one of your predefined Remote Targets from the list. Click "Next" to continue. The steps that follow may vary depending on the platform you've selected, as each Remote Target might require different information. Just follow the prompts and click "Next" after each step. In the final step, you'll see a summary screen showing key details such as the source of the data, the selected Remote Target, and the specific columns that will be exported. Once you’ve reviewed everything, click "Save" to complete the setup.
Data Export Node Configuration
Update Tag
The Update Tag node is designed to manage audience tags during your campaign journey. It allows you to add, remove, or update key-value paired tags to help with audience segmentation and targeting.
Update Tag
In the “Add these tags to audiences” field, you can enter the tags you want to assign to users. Simply type a tag and press Enter to confirm it. For example, if users completed a specific action, you might tag them as engaged or webinar-attendee. Type each tag and press Enter to confirm.
In the “Remove these tags from audiences” field, you can specify tags that should be removed from users. Similar to the add field, type the tag name and press Enter after each one to ensure it is properly recognized and applied.For instance, you might remove a new-user tag once someone has completed onboarding.
If you want to work with key-value tags, you can use the “Update Key Value tags” section. First, select a key from the dropdown list. Then, enter the new value you want to assign to that key for the users passing through this node. This is especially useful for more detailed user categorization and targeting. For example, let’s say you want to tag users based on their subscription type. In the “Update Key Value tags” section, select the key subscription from the dropdown, then type premium as the value. Every user who reaches this step in the journey will now be tagged with subscription: premium, making it easy to group and target them later.
If the tag you need doesn’t already exist, you can click on “New Create Tag.” This allows you to create and use a new tag specifically for your current journey.
Update Contact
The Update Contact node allows you to update one or more fields in the master_contact table with constant values during a campaign journey. This is useful for tracking user actions, or assigning statuses as users progress through the flow.
Update Contact
How to configure “Update Contact” node:
Selecting the Target Column: Click on the contact field you want to update such as total_spent or orders_count. Select "Constant Value" as the update type.
Inputting or Selecting the Value: Enter the value you want to assign. Make sure the value matches the column's data type (e.g., number, date, text).
Click Save to apply your changes.
Important Note on Contact Information Update
Multiple Column Updates:
This feature supports updating more than one column in the master_contact table.
Setting Values by Data Type:
Depending on the data type of the target column, you will need to input the value accordingly. Here are some common scenarios:
- TEXT Type: Options include:
- Null Value
- Empty Value
- Specific Text: Enter the text you wish to update the contacts with.
All contacts in the node will be updated with the chosen text value.
- DATE Type: Options include:
- Current Date: Automatically updates the column to the current date.
- Specific Date: Enter a specific date for the update.
All contacts in the node will be updated with the chosen date.
- BOOLEAN Type:
- Choose either TRUE or FALSE to update the contact..
All contacts in the node will be updated with the selected Boolean value.
WhatsApp
To learn how to configure and send WhatsApp campaigns, please visit the WhatsApp page. It provides detailed information on integration steps, message template setup, campaign creation, and how to use the WhatsApp channel within your journeys.
Paid Social
The Paid Social node lets you add or remove contacts from an audience in Google Ads or Facebook Ads. This means you can manage who sees your ads, like people who clicked an email, visited your site, or almost made a purchase without manually uploading anything.
To begin, drag and drop the Paid Social node into your campaign flow. Then, double-click on the node to open the configuration screen. Here, you'll be asked to select a Remote Target. You’ll see two options: Google Customer Match and Facebook Custom Audience. Choosing one of these determines where your audience data will be sent.
Paid Social
If you select Google Customer Match, clicking the Next button will take you to a screen titled Google Audience. On this screen, you can either create a new audience or choose from existing ones. To create a new Google audience, click the "New Audience" button. You'll then be asked to fill in the Name and Description of your audience. Next, select the Type of audience data you'd like to send, either contact or mobile.
Below that, you'll also choose the Action Type. You can either select Add to add users to the audience or Remove to delete them from it. These actions help control how your audience list evolves on the Google Ads side. If you don’t want to create a new audience, you can simply select one from the existing list shown on the screen. Each entry includes a name, description, and user list type for easier identification. Once selected, click Next to proceed.
After configuring the audience, you'll be taken to a summary screen. This screen lets you review everything you've selected so far. If everything looks good, click Save to complete the setup. The node will then be ready to send contact data to your chosen Google audience.
You’re running a summer promotion and want to reach users who clicked on your campaign email. To do this, you use the Paid Social node to send their email addresses to Google Customer Match. You create a new audience called PromoClickers_Summer2025, select “contact” as the data type, and choose the “Add” action. This way, those users will start seeing your summer sale ads across Google platforms shortly after engaging with your email.
The steps for Facebook Custom Audience are very similar. After choosing Facebook as your remote target, you'll either create a new audience or select an existing one. Just like with Google, you’ll define whether you want to add or remove users from that audience. After reviewing the summary, save your settings to activate the connection.
You want to avoid showing ads to users who already completed a purchase during your campaign. To manage this, you use the Paid Social node to send their data to Facebook Custom Audience with the action set to “Remove.” You select your existing audience called GeneralCampaignAudience so that these converted users are automatically excluded from future ad delivery. This helps prevent redundancy and ensures your ads reach only potential new customers.
Using the Paid Social node in this way lets you automate audience updates, eliminate manual exports, and ensure that your paid social campaigns are always reaching the right people.
Web API
A Web API (Application Programming Interface) allows different software systems to communicate with each other over the web. It defines a set of rules and protocols for building and interacting with software applications.
The Web API Call node allows you to to transfer data from D-Engage to your own systems or third-party services via a defined API endpoint.
Define a Remote Target for Web API Calls
Before using the Web API Call node in your campaign flow, you must first define a Remote Target. This tells the system where to send your API requests.
How to Define a Remote Target for Web API
- Navigate to Settings Go to Settings > Integrations > Remote Targets in the D·engage interface.
- Add a New Remote Target Click the Add button to start the setup.
- Fill in the Required Fields Complete the form with the following details:
- Name: Enter a unique name for the remote target. This name will be used when selecting the API target in the campaign flow.
- Type: Select Web API from the connection type dropdown.
- Base URL: Enter the base URL of your API
- Endpoint: Specify the exact endpoint you want to call, such as: /bulkupsert
- Authentication Type: Choose the appropriate authentication type. If your API doesn't require authentication, select None (default). For APIs that do require it, you can choose Basic.
- Save Click Save to complete the setup. Your Remote Target is now available and can be selected when configuring the Web API Call node in your campaign journey.
Set Up the Web API in Your Campaign Flow
Create a New Campaign Flow
- Navigate to Campaigns > Flow in the platform.
- Create a new campaign, selecting either one-time or recurring as needed.
Add the Web API Node
- From the Actions panel on the left, find the Web API node.
- Drag and drop the Web API node into your campaign flow.
Configure the Web API Node
- Double-click the Web API node to open the configuration modal.
- Select your Remote Target from the available list.
Select Remote Target
- Provide a name for this export. This can be any name you prefer for internal reference.
Export Name
Define the Data to Export
- In the next screen, choose the columns to send to the selected Remote Target.
- You can include:
- Custom Columns
- Columns from your campaign table
- Columns from your master_contact or master_device table
Note:
- The system requires and automatically includes contact_key (for master_contact) or device_id (for master_device).
- These fields are pre-selected and cannot be unchecked.
- If there are any column name conflicts (e.g., duplicate names across tables), the system will automatically rename them to prevent errors.
Select Columns
Review and Finalize
- On the final screen, you’ll see a summary along with a sample cURL request for reference.
Summary
The exported JSON output will consist of two main parts:
- **CampaignParameters: **Contains system-generated metadata fields like CampaignId, CampaignName, CampaignInstanceStartTime, DeliveryTime, SendId, and SendName.
- **RowList: **Includes:
- Your custom key-value pairs (repeated for each row)
- Data from the campaign table (if used as the audience source)
- Data from the master_contact or master_device table (including required fields like contact_key or device_id)
Save and Finalize
- Click Save to complete the configuration.
- The node in the campaign flow will update to reflect your Web API setup.
Action Node Statuses
| Status | Description | Channel |
|---|---|---|
| Sent | The message has been sent from the system and is on its way to the user's device or contact method. | All channels (Email, SMS, Push, In-App, On-Site, WhatsApp |
| Delivered | The message has successfully reached the user’s device (e.g., phone, inbox, app). | Email, SMS, Push, WhatsApp, A/B Split |
| Opened / Opens | The user has opened the message (e.g., email opened, WhatsApp message read). | Email, WhatsApp |
| Clicks / Click | The user clicked a link or element in the message. | SMS, Push, In-App, On-Site |
| Displayed | The message appeared on the user’s screen (e.g., an in-app pop-up was shown). | In-App, On-Site |
| Dismissed | The user closed or ignored the message after it was displayed. | In-App, On-Site |
AI Nodes
AI Nodes help you increase engagement by automatically choosing the best time or channel to reach each contact. These smart nodes use historical interaction data to send messages when users are most likely to respond—or through the channel they prefer most.
Optimize Channel and Time nodes are currently available only for One-Time Campaigns.
AI Nodes
Types of AI Nodes
| Node Name | Description |
|---|---|
| Optimize Time | This node sends the message at the time when each user is most likely to engage. It analyzes past behavior and automatically schedules the message to be delivered at the user's most active or responsive time. |
| Optimize Channel | This node selects the most effective communication channel for each user—such as email, SMS, or push notification—based on their past response patterns. If no history exists, it uses your default channel. |
| AI Split | Designed for recurring flows, this node tests channels over time and uses AI to select the winning channel based on opens, clicks, or conversion rate. |
Optimize Time
This node helps you send messages at the time each user is most likely to engage. It looks at past behavior to find the best time to deliver emails, push notifications, SMS, or web push messages. Please note that Optimize Time is exclusively available for One-Time Campaigns.
Optimize by Time and Channel
To set up Optimize Time, start by selecting at least two time slots from the available options: Morning, Midday, Evening, and Night. These slots represent different parts of the day when your users are most likely to engage. You can adjust the exact hours for each time slot in the Optimize Time and Channel settings.
Important Consideration
The time frames for this feature can be fine-tuned in the Settings > Campaign Configurations >Time Categories by Channel. Here you can establish specific intervals that define each time slot throughout the day.
Then, choose the channels you want to use in your campaign—Email, Mobile Push, Web Push, or SMS/MMS. For each channel, select the message content from the dropdown menu using your pre-created content.
After choosing the content, you can configure settings to fine-tune how each message is delivered. Once everything is set, click the Save button. The system will then automatically create separate journey paths for each Time Slot × Channel combination, ensuring your messages are sent at the most effective times.
Tips:
- Each piece of content will be automatically duplicated and labeled with incremental numbers (1, 2, 3, etc.) at the end of the content name to indicate different time slots.
- You can edit the contents by double-clicking on them if modifications are necessary.
- Wait nodes within this context are not editable since Optimize Time automatically configures the wait durations.
- Should you need to revisit your time optimization choices, you can re-enter the configuration by double-clicking on the Optimize Time node.
Practical Use Case Example
Let’s say you schedule a one-time campaign to start at 14:00, and you’ve selected Midday and Morning as your preferred time slots. At the campaign’s start time (14:00), the system will first send the message to users who are most active around midday. Then, instead of sending to everyone at once, it will automatically wait until the next morning to deliver the same message to users who are more likely to engage during morning hours. This way, each user receives the message at a time when they’re most likely to notice and interact with it, helping boost your overall engagement.
Optimize Channel
Optimize Channel helps you send messages through the best communication channel for each user. It looks at past engagement data—like whether a user usually clicks on emails, SMS, or push notifications—and picks the channel they are most likely to respond to.
If there's no history available for a user, the system will use a default channel you choose to make sure everyone gets the message.
This feature works only with One-Time Campaigns and helps increase the chances of your messages being seen and acted on.
Optimize by Channel
To set up Optimize Channel, start by selecting the channels you want the system to optimize for. You can choose one or more from the available options—Email, SMS/MMS, Mobile Push, and Web Push. These are the channels through which your campaign message may be sent, depending on each user's engagement history.
Next, assign content to each selected channel. You’ll choose from your existing content using the dropdown menus provided. This ensures that every channel has the right message ready to go, tailored to suit the format of that channel.
Once your channels and content are set, you can configure settings to fine-tune your strategy if needed. When everything is ready, click the Save button to confirm your setup.
After saving, the system will automatically create paths for each selected channel. These paths determine which channel each user will receive the message through—based on their past interactions or your chosen default option.
Imagine you're launching a promotional campaign for a new product and want to make sure each user receives the message through the channel they prefer.
For example, you select Email, Mobile Push, and Web Push as your channels. From your past data, you notice that some users often click on emails, others engage more with push notifications. You assign tailored content for each:
- For Email, you select a beautifully designed product announcement.
- For Mobile Push, a short and catchy notification.
- For Web Push, a concise version of the same message.
When you launch the campaign, the system checks each user's past behavior:
- User A has consistently clicked on emails in past campaigns, so they receive the email version.
- User B has interacted mostly with Mobile Push notifications, so they get the mobile push.
- User C is new and has no history, so the system sends the message via the default channel you set, Email.
This way, each user gets the message through the method they are most likely to engage with, increasing your campaign's effectiveness without manual segmentation.
Tips:
- Content adjustments can be made easily by double-clicking on the content names, allowing you to enter edit mode and make the necessary changes.
- Should you need to revisit your channel optimization choices, you can re-enter the configuration by double-clicking on the Optimize Channel node.
AI Split
The AI Split Node is an advanced feature specifically designed for recurring campaign flows. This node works on a campaign basis and utilizes AI to determine the most effective communication channel.
The AI Split Node is tailored for recurring campaign flows, ensuring consistent optimization over time.
AI Split Node – Supported Channels & Events
| Channel | Supported Events |
|---|---|
| Push | Click, Open |
| In-App | Click, Open |
| On-Site | Click, Open |
| Click, Open | |
| SMS | Click, Open |
Metric Selection:
After adding the AI Split Node to your workflow, you must select the metric that will be used to determine the winning channel. The available metrics are:
- Opens: Measures the count of recipients who open the campaign messages.
- Clicks: Measures the counts of recipients who click on links within the campaign messages.
- Conversion Rate: Measures the percentage of recipients who complete a purchase.
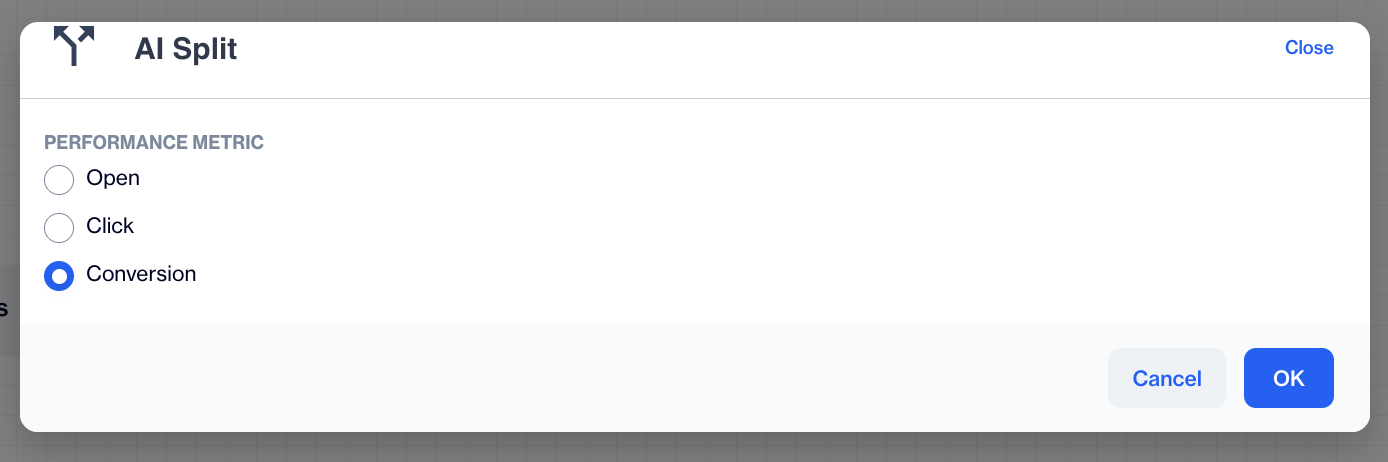
Performance Metric
Channel Testing Period
When you split the campaign by channels (e.g., Email, SMS), the AI Split Node sends the campaign to each channel for a duration of up to one week.
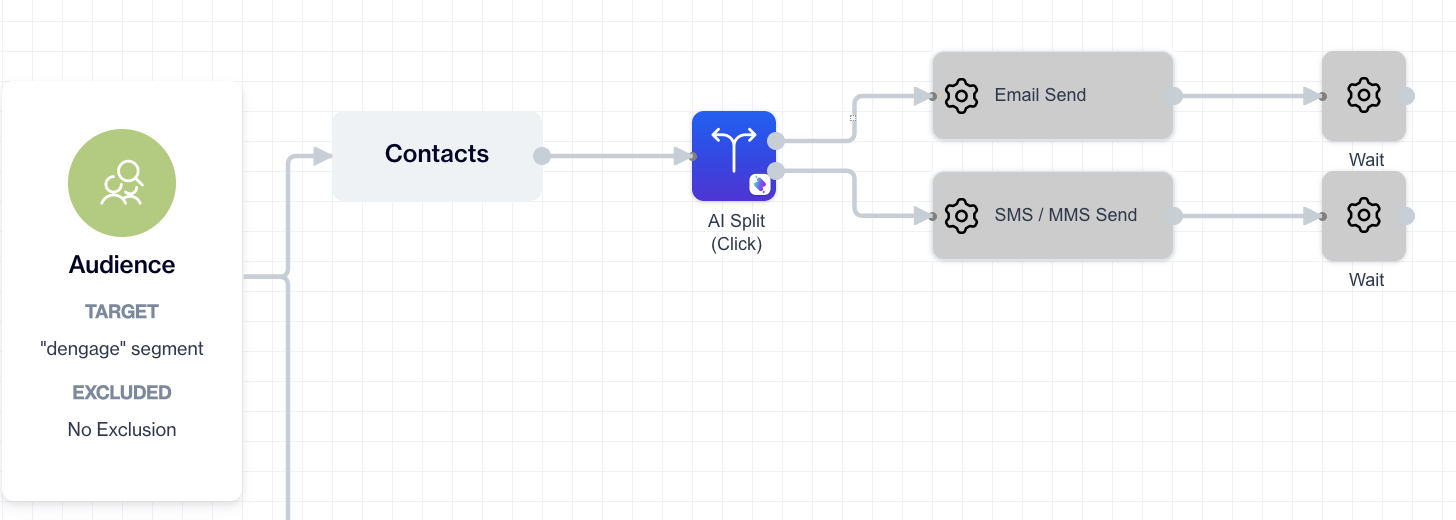
AI Split
Winner Selection
After up to one-week testing period, the AI analyzes the selected metric (Open, Click, Conversion Rate) to determine the most effective channel. Subsequent campaign messages are then sent exclusively through the winning channel, maximizing engagement and effectiveness.
The AI Split Node ensures that your recurring campaigns are continuously optimized for maximum engagement and effectiveness.
Decision Nodes
Decision nodes are logic points in a user journey that determine the next step based on user actions, attributes, or random selection. These nodes guide users through different paths depending on how they interact with the journey or meet certain conditions.
Decision Nodes
Types of Decision Nodes
| Node Name | Description |
|---|---|
| Engagement Split | Routes users based on how they interacted with previous messages—for example, whether they opened an email or clicked a link. |
| Random Split | Randomly splits users into different paths. Great for testing different versions of a journey. |
| Decision Split | Sends users down different paths based on specific criteria, like location, purchase history, or specific attributes. |
| Wait | Adds a delay before moving to the next step in the journey. Useful for pacing communication. |
| Join | Merges multiple paths back into one after a split. |
| End | Marks the end of a journey. Once users reach this node, no further steps are taken. |
Engagement Split
The Engagement Split node helps you divide your audience based on how they interacted with a message you sent. It must be connected directly after a Send node (such as Email, SMS, Push, In-App, or On-Site), because it uses the engagement data from that message to determine how to split the audience.
When you click on the Engagement Split node, you’ll see options to choose how to split the audience. These options depend on the type of send connected before it. For example:
- Delivery: Splits the audience based on whether the message was delivered.
- Open: Splits the audience based on whether the message was opened.
- Click: Splits the audience based on whether a link in the message was clicked.
Engagement Split
To use the Engagement Split node, begin by adding a Send action to your journey. This can be any message type such as Email, SMS, Push, In-App, or On-Site. The Engagement Split must be connected directly after this Send node, as it relies on the engagement data generated from the message to function correctly.
Once you have connected the Engagement Split node, click on it to open the configuration modal. Within this interface, you will be able to select the type of interaction you want to use to divide your audience. The options available will depend on the type of message sent. For example, if it follows an email, you might see options like Delivery, Open, or Click. These options allow you to define what type of engagement should determine the split.
After choosing the desired engagement type, you will see two output wires that represent different audience paths. The green wire corresponds to contacts who have engaged with the message in the selected way (e.g., opened or clicked), while the gray wire represents those who have not. You can then build distinct follow-up actions for each segment to personalize your communication based on user behavior.
Engagement Types by Send Types
| Send Type | Available Engagement Types |
|---|---|
| Delivery, Open, Click | |
| SMS | Delivery, Click |
| Push | Delivery, Open, Click |
| In-App | Display, Dismiss, Click |
| On-Site | Display, Dismiss, Click |
| A/B Split | ℹ️ Varies by the selected channel (Email, Push, On-Site) |
Random Split
The Random Split node allows you to divide your audience randomly into up to three distinct paths. This feature is useful for creating varied campaign experiences such as A/B or A/B/C testing, experimentation, or distributing traffic across multiple strategies.
Initiating Random Split
To begin, connect the Random Split node to any available audience segment. This connection is typically made following an action node, allowing you to distribute the campaign audience at the onset of their journey.
Configuring Path Percentages
By default, the Random Split node divides your audience into two paths. You can adjust how much of your audience goes into each path by entering the desired percentages (e.g., 50% and 50%, or 70% and 30%).
If you want to divide your audience into three paths, click the Add button. This will create a third path where you can enter a new percentage. Make sure the total of all percentages adds up to 100%.
Configure Path Percentages
Once you've set the percentages, click Save.
Mapping Out the Journey
After setting your random split paths, connect each path to the next step in the journey. This could be an Action node (like Email or SMS) or a decision node (like a wait, or end).
This way, each group of users will follow a different path based on the split, allowing you to create unique experiences for each audience segment.
Decision Split
The Decision Split node allows you to segment your audience based on predefined rules, such as saved segments or custom SQL queries. It helps you guide each contact down the most relevant path.
Initiating a Decision Split
To add a Decision Split to your campaign, connect it immediately after an Action node in the flow.
Defining Your Decision Criteria
Set up your decision logic by adding filters to define which contacts should continue through this path. Once your conditions are in place, click OK to save. For example, you can create a segment that includes users who have made a purchase within the last thirty days.
Decision Split
Using Exclusion Filters
To fine-tune your audience even further, you can apply exclusion filters to remove specific users from the segment based on additional conditions.
Establishing Pathways After the Decision Split
Once you've set your Decision Split criteria, you need to connect each outcome to the next step in the flow:
- 🟢 Green Wire: This path represents contacts who match the segment or criteria you defined.
- ⚪ Gray Wire: This path represents contacts who do not match the criteria.
Example Use Case:
In the illustration above, the Decision Split is used to check whether users completed an order after receiving an Email Campaign:
- Users who did not complete an order are directed to receive a Push Notification as a follow-up.
- Users who did complete an order are not sent any further messages, ending their journey in the flow.
This setup helps ensure that only the right audience continues receiving communication based on their behavior.
Join
The Join node is used to merge multiple paths back into a single journey flow. This is especially helpful after using split nodes such as Engagement Split or Random Split, where your audience is divided based on behavior or distribution logic. The Join node brings those separate branches together, allowing the journey to continue from a common point.
How to Use “Join” Node in a Campaign Flow
When building a journey that includes multiple audience paths for example, one for users who clicked a message and another for those who didn’t you may want to continue with a shared follow-up action, such as sending another message. To do this, place a Join node after each of the split paths and connect all branches to it.
Once the paths converge at the Join node, you can continue building the journey from its single output. This allows for a unified action following previously segmented logic.
Wait
The Wait node allows you to add intentional delays between steps in your campaign flow. It's especially useful after actions like sending a message, giving your audience time to engage before the next step occurs. By controlling the timing between nodes, you can improve the pacing of your campaign and increase overall engagement.
To get started, drag the Wait node into your journey and place it right after the node where you want the delay to begin. Typically, this would be after a Send node (such as Email or Push), but it can also follow other action nodes.
When you click on the Wait node, a configuration window will appear with two options: Duration and Wait Until.
Wait Node
If you choose Duration, you’ll be able to set a time-based delay. First, select the time unit from the dropdown menu minutes, hours, or days then enter the number of units you want the system to wait for. For example, if you want a one-day delay before the next message, select "Days" and enter "1". This creates a simple, fixed pause between nodes in your flow. After entering your values, click the Save button.
Alternatively, if you want the journey to pause until a specific calendar date, choose the Wait Until option. This is ideal for date-sensitive campaigns, such as events, holidays, or promotions. Simply select the exact date and time when you want the journey to resume. Once set, click Save to confirm.
After configuring the Wait node, you can continue building your journey by connecting it to the next node such as another message, or an action. The system will hold each contact at the Wait step until the defined condition is met, ensuring your messages are delivered with optimal timing.
End
The End node marks the termination point of a journey path. Once a contact reaches this node, they exit the flow entirely and no further actions will be executed for them within that journey.
How to Use “End” Node in a Campaign Flow
You should use the End node at the end of each path that you do not intend to continue. For example, if a contact does not meet a specific condition or fails to engage, you might direct them to an End node. This ensures the flow stops cleanly and prevents further processing or unintended actions.
In split scenarios, not every path needs to rejoin the main journey. Some branches such as those containing disqualified or inactive users can end independently. In such cases, simply place an End node at the end of that path to finalize it.
Related Articles
Directly on Flow
To create an on-site campaign directly within the Campaign flows, follow these steps: Access Campaign Flows: Navigate to the Campaign flows section in your account. Click on the "New" Button: In the upper right corner of the page, you’ll see a New ...Directly on Flow
To create an email campaign directly within the Campaign flows, follow these steps: Access Campaign Flows: Navigate to the Campaign flows section in your account. Click on the "New" Button: In the upper right corner of the page, you’ll see a New ...Directly on Flow
To create a SMS campaign directly within the Campaign flows, follow these steps: Access Campaign Flows: Navigate to the Campaign flows section in your account. Click on the "New" Button: In the upper right corner of the page, you’ll see a New button. ...Directly on Flow
To create a push campaign directly within the Campaign flows, follow these steps: Access Campaign Flows: Navigate to the Campaign flows section in your account. Click on the "New" Button: In the upper right corner of the page, you’ll see a New ...Directly on Flow
To create an in-app campaign directly within the Campaign flows, follow these steps: Access Campaign Flows: Navigate to the Campaign > Targeting > In- App section in your account. Click on the "New" Button: In the upper right corner of the page, ...