Web Push SDK Setup
Requirements
- D·engage Application Definition
- Access to your Website Files
D·engage Web SDK provides an interface that handles device subscriptions and web push notifications. Optionally, it also provides event tracking functionality for your website.
1. Creating the D·engage Application
In order to use the Web SDK you have to create a Push Application definition in the D·engage platform and add the necessary files and code to your website.
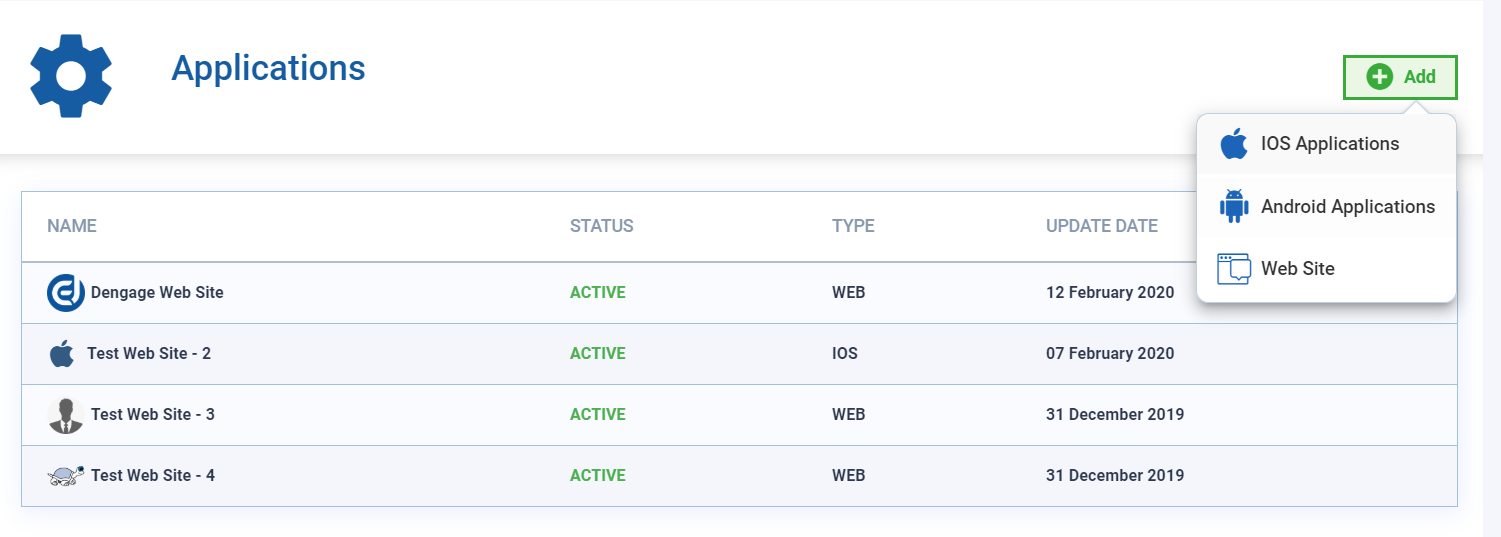
1.1 From the D·engage admin panel go to Settings > Applications and select “Add a New Website”
1.2 Enter your website and default logo URL and enable Push Notifications
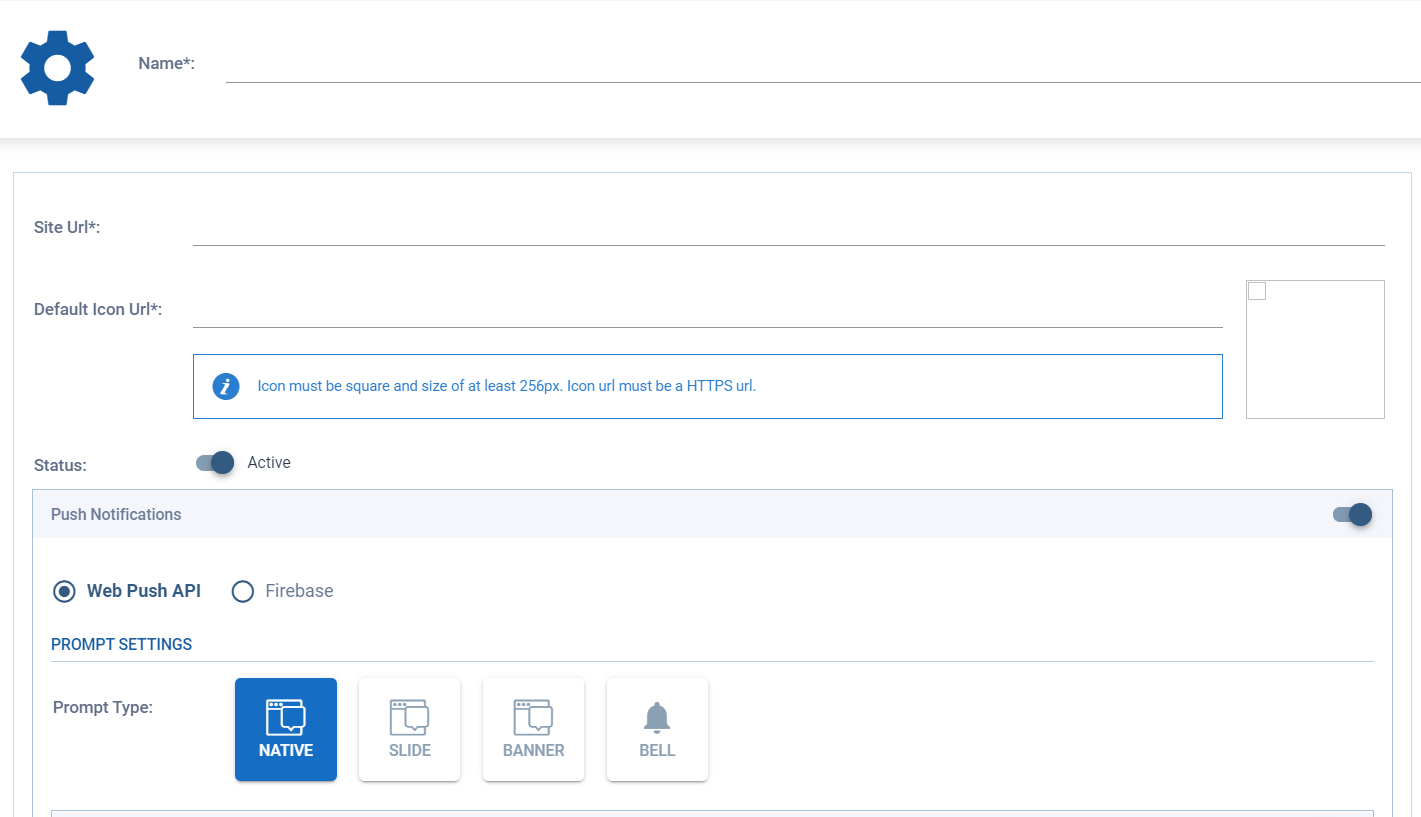
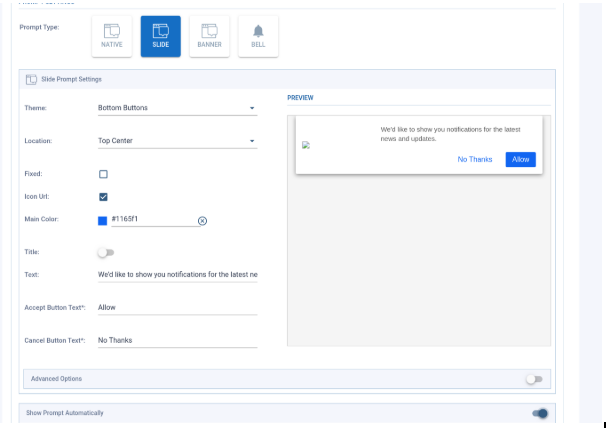
1.3 Select the appearance of the Web Push permission message from the “Prompt Type” options
Note: If you enable the “Show Prompt Automatically” option, the permission prompt will be shown automatically.
2. Updating your Website Code
Once you have created the Push Application from the D·engage web UI, your website integration information will appear as shown below.
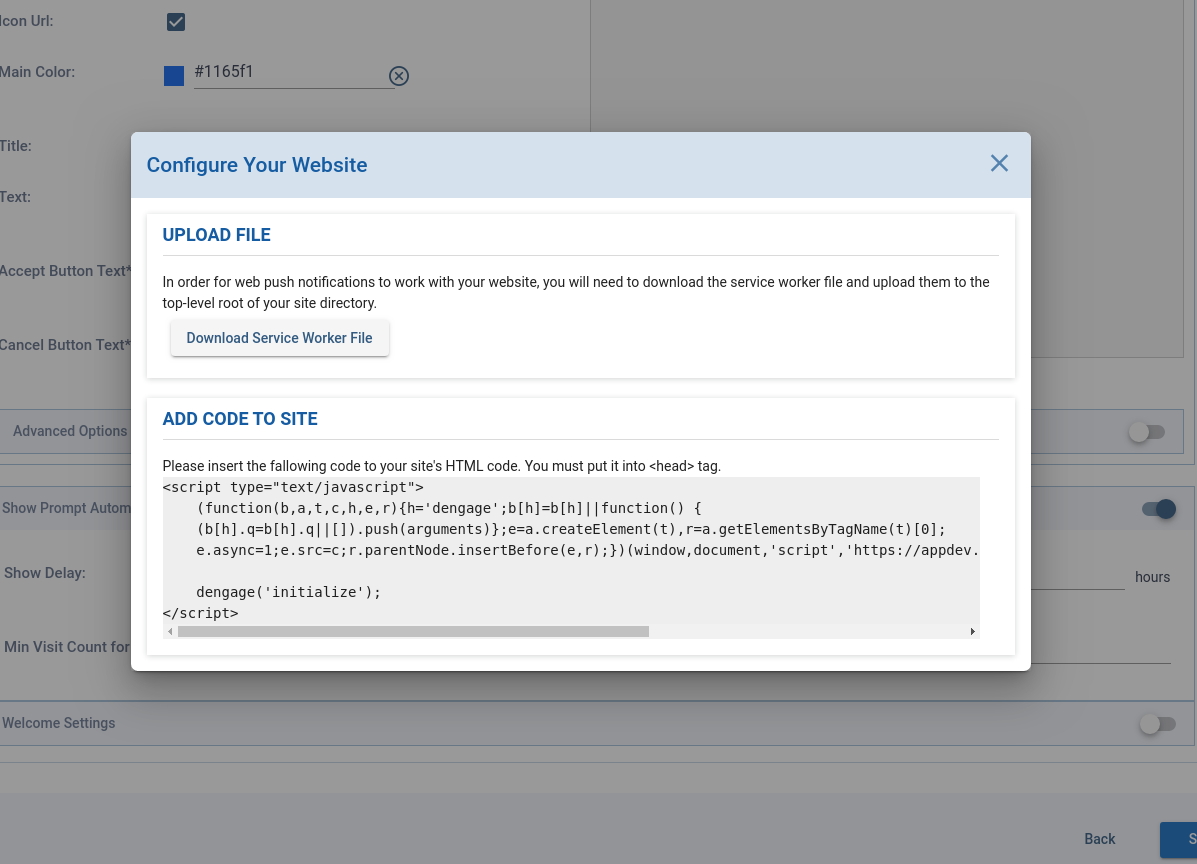
2.1 Download the service worker file and add it to your website’s root folder.
2.2 Insert the given code snippet to your website’s HTML code.
If you enabled the “Show Prompt Automatically” option, your web push integration will automatically work. Alternatively, you can manually trigger the notification using the SDK functions.
3. How to create an Apple Safari Web Push Certificate
3.1 Open Keychain Access on your Mac computer, Applications > Tools > Keychain Access.
3.2 From the top menu select Keychain Access > Certificate Assistant > Request Certificate from Certificate Authority.

3.3 You can continue by filling in the required fields and selecting the Save to disk option.

3.4 Log into your Apple Developer Console and select Certificates, Identifiers & Profiles

3.5 Select Identifiers from the menu on the left. Then select the blue + button

3.6 Select the Web Push IDs radio button. Then select the blue Continue button.

3.7 Fill in the Description field and give your ID a unique identifier. Select the blue Continue button

3.8 Double check your name and identifier then register your Website Push ID

3.9 Select your newly made Safari Website Push ID.

3.10 Create a new Production Certificate

3.11 Select Choose File to upload your Certificate Signing Request (CSR) file if you have it saved locally. Otherwise select Learn more > for instructions on how to generate one

3.12 Download your new certificate. Double click to add this certificate to your Keychain. Right-click your certificate inside Keychain Access to export to a .p12 file.

3.13 Add a password to your certificate. You will need to remember this password when you upload the .p12 file to the Dengage Dashboard.

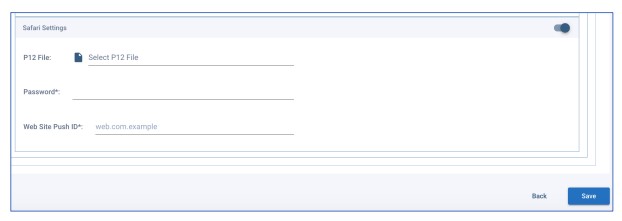
3.14 You should now be able to take this .p12 file and upload to your dEngage Account. From Settings > Application, click the web application you want to add the certificate to. Next, open Push Notifications, then at the bottom, open the Safari Settings. Once you upload .p12 file, insert password and type your web site push ID, then click on Save.
4. Usage of the Web SDK
Once you insert the Web SDK code to the main HTML file, the main functionality of the SDK will start automatically. This includes showing Web Push Notification permission prompts and tracking the notification subscriptions. So the initialization function is important.
<script type="text/javascript">
…….
dengage(‘initialize’);
</script>
4.1 Triggering Notification Prompt Manually
If you enabled the “Show Prompt Automatically” option in the D·engage admin panel, you don’t have to implement this step. Otherwise, to trigger the prompt manually, use the showNativePrompt or showCustomPrompt functions
showNativePrompt shows browser’s native prompt immediately.
showCustomPrompt shows the type of prompt you have selected in your application settings. For example a Slide or a Banner. Native prompt will be shown after the user accepts.
dengage('showCustomPrompt'); //for showing selected prompt in app settings
dengage('showNativePrompt'); //for showing native prompt
If you have a Button or Banner for getting notification permission you can use showNativePrompt in the click handler of that Button or Banner.
4.2 Getting Notification Permission
You can use getNotificationPermission function for getting the user’s current notification permission. This function returns a string value that can be ‘granted’, ‘denied’ or ‘default’.
dengage('getNotificationPermission', function(permission) {
    if (permission == 'granted') {
       //permission granted
    } else {
       //permission not granted
    }
});
4.3 Getting Current Web Push Token
Use the getToken function in order to get the current Web Push Token. This function returns null when the Web Push permission was not granted.
dengage(‘getToken’, function(token) {
    if (token == null) {
       //token is not available
    } else {
       //we have token
    }
});
4.4 Checking the Web Push Browser Support
Use isPushNotificationsSupported function to learn whether the browser supports Web Push Notifications. This function returns true if Web Push Notifications are supported.
dengage(‘isPushNotificationsSupported’, function(isSupported) {
    if (isSupported) {
       //push notification is supported
		    } else {
       //push notification is not supported
    }
});
4.5 Using the User Information
When the user logs in you get the user information, which means you have a contact_key for that user. You can set a contact_key in order to match the user with the browser. There are two functions for getting and setting a contact_key.
If user logged in set user id. This is important for identifying your users. You can put this function call in every page. It will not send unnecessary events.
dengage('setContactKey',userId);
If you need to get current user information from SDK use this function.
dengage('getContactKey', function(userId) {
     //use userId (contact_key) here
});
If you have another id that is specific to the browser and unique between browsers. And if you want to use that id for tracking instead of the one that is generated by SDK, then you can use the setDeviceId function.(please use with caution)
dengage('setDeviceId',yourDeviceId);
You can get current deviceId from SDK by using getDeviceId function.
dengage('getDeviceId', function(yourDeviceId) {
     //use yourDeviceId here
});
4.6 Sending Device (Browser) Custom Events