Woocommerce Plugin for D·engage Integration
Install WP Plugin
It's the same thing that we perform every time when we want to install any WP plugin.
Just sign in to your WP Admin Panel / WP Dashboard

Navigate to the Plugins Option in Left Navigation Bar
You have to navigate to the Plugins option in the left navigation bar, hover the mouse pointer on Plugins option, a side drop will appear, and click on the “Add New” Option in the side drop.

Upload and Install the Plugin
The following page will appear, Click on the Upload Plugin button.

Upload your plugin file by clicking on the Choose File button and then click on Install Now for Plugin installation, as shown in the following image.

Congratulations the Dengage Integration Plugin has been installed successfully!
Plugin Configurations
Now you just have to set up some Configurations. This configuration setting is actually the thing that creates a path between D·Engage CDMP and your Website for the exchange of informative and productive data.
Steps For WP Plugin Configuration
Following are steps to follow for installed Dengage Plugin configurations, that enable the exchange of data from your application to the CDMP platform.
Dengage Plugin Configurations
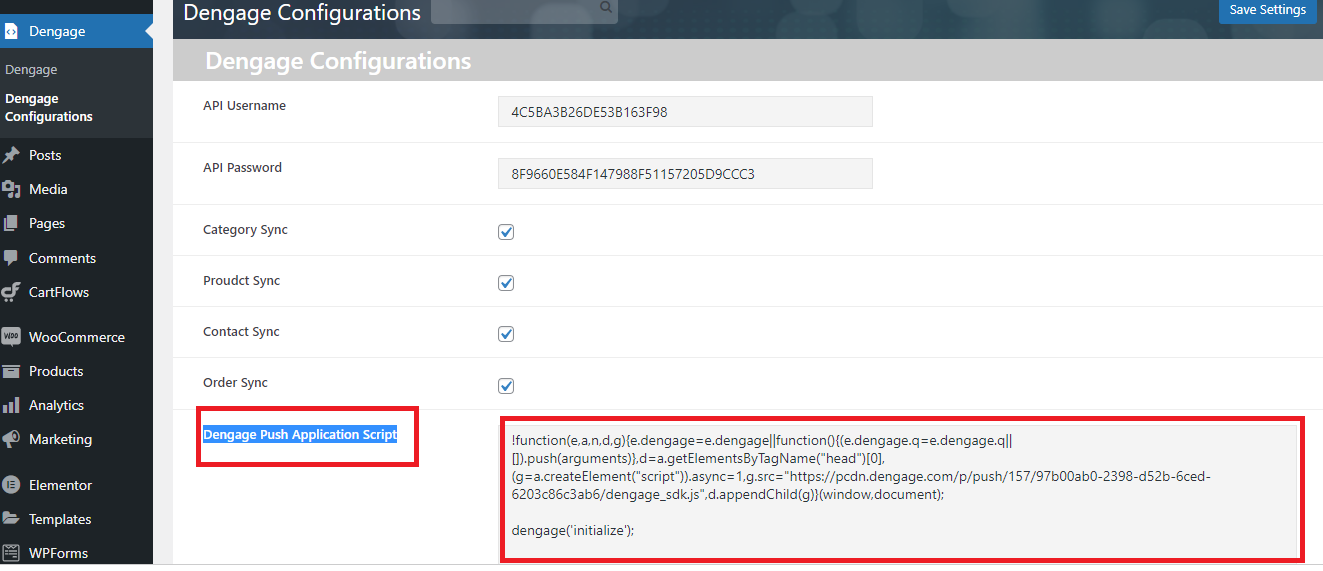
Hover the mouse on Dengage Plugin. A side drop will appear, Click on Dengage Configurations in the side drop menu. The following page will appear.


Now you have to set the following configurations.
API Username
API Password
Dengage Push Application Script
All these three values will be obtained from the CDMP platform.
Check all the checkboxes
Category Sync
Product Sync
Contact Sync
Order Sync
Get API Username and Password
Go to the CDMP account. Click on the Settings option in the bottom left corner, a side drop will appear then click on API Users under the Users Section. The following page will appear.

Click on the Add button in the API User Page.

Activate all Radio buttons , copy the API Username and Password and Save the API User.
Paste the API Username and Password in wordpress Plugin Fields.

Paste here

Enter SDK code to Plugin
Now you have to enter the SDK code to the Plugin in the Dengage Push Application Script field.
In the Settings menu on Bottom Left click on Applications following page will appear.

Select your added Web Application.Click on Actions drop menu on Top Right corner and select See Setup Guide option. Following page will Appear.
Copy the Code Captioned Add Code to Site.

Paste The copied SDK code to Dengage Push Application Script field in Wordpress Plugin page and save the settings.
Note: Add the code without script tag.
Data Sync
You can also sync Wordpress Categories, Products , Contacts and Orders Tables data to Your CDMP Platform that provides you the targeted audience for your marketing campaigns. It's a one step process.
Just point to Dengage Plugin and select Dengage from side drop, A page will appear with four buttons, press all buttons and your data will be synced.

Note: The four tables in CDMP Dataspace should have similar Attributes(Columns) as in Wordpress Database.
Now your Wordpress Plugin is fully setup and you are all done.
Related Articles
D·engage GTM Integration
There are two different ways for GTM integration. You can create new google tags as well as, you can use existing ones. (a) Using Existing Tags for Sending Events Data In order to use your existing triggers to send data to the D·engage platform you ...Mixpanel - D·engage Integration
Mixpanel is a leader in the product analytics space, that provides real-time insights into app/website interactions and leverages brands to devise effective marketing strategies according to their customer behavior. D·engage provides an ...SurveyMonkey - D·engage Integration
With the SurveyMonkey integration, you can now import survey responses directly into your D·engage account, enabling you to enrich your Master_Contact table and build segments based on audience responses to create a more personalized experience. ...Neto Integration
Neto D·engage Integration In a matter of minutes, without a single line of code you will become able to connect your Neto store to your D·engage account. This integration is a one-way sync that sends your product catalog as well as your contact and ...Event Data Integration
There are two options to send Event Data to D·engage: 1. Send event data via D·engage SDK First, you need to create a website application to use the dEngage Web SDK. Go to D·engage Event SDK page for detailed instructions to 'create an ...