Automated Flows
In the realm of data-driven marketing, automated flows are pivotal in orchestrating a sophisticated data management strategy that precedes and enhances communication efforts. These flows serve as an automated infrastructure that intelligently manipulates and prepares data, setting the stage for highly targeted and effective campaign engagement.
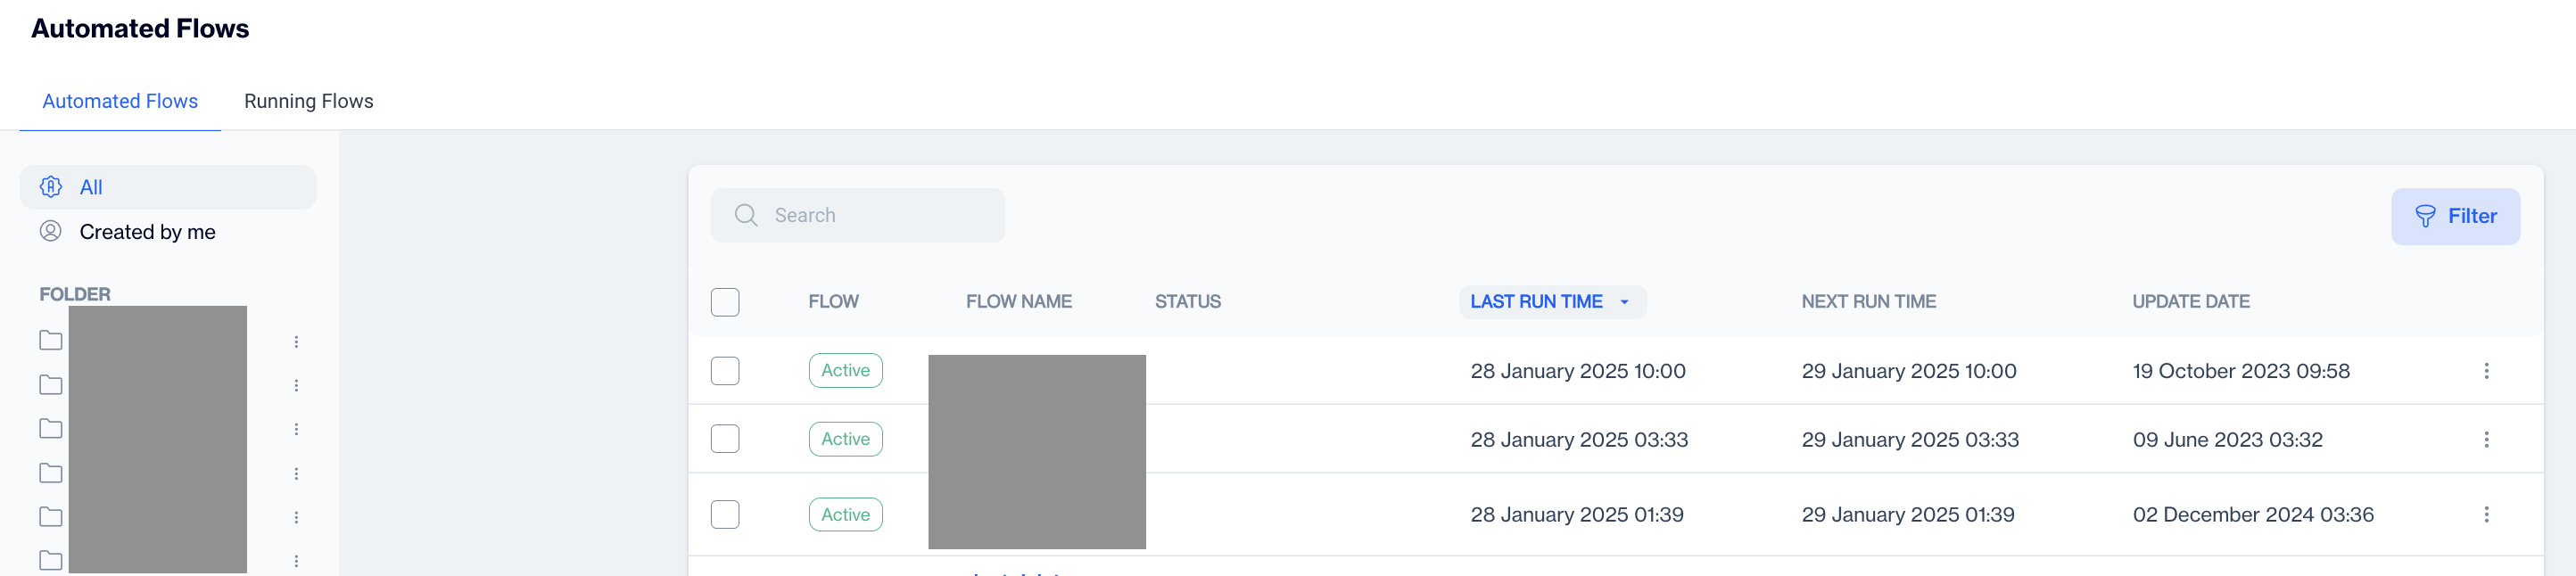
This section displays the automated flows with the following columns: Flow, Flow Name, Status, Last Runtime, Next Runtime, and Update Date. The system includes two tabs for automated flows: Automated Flows and Running Flows. By default, the system will display the Automated Flows tab.
List Of Automated Flows
When you dropped in the Automated Flow Main Page you will see list of automated flows having enabled actions alongside with folder and filtering options . Let's dive into those section together.
1.Navigation Tabs: This fields allows you navigate between Automated Flows and Running Flows . Running Flows gives you an overview about the Automated Flows that currently in progress
2.Folder Pane: This field allows you manage segments based on folderstructure .
- Created By Me: Allows you to quick filter the list of automated flows that have been created by your user.
3.New: Allows you to start creating new automated flow.
4.Search and Filter
- Search Box: Search box allows you to instantly search created automated flows by given names.
- Filter: Filter allows you to filter the list of automated flows by following parameters:
- Jobs By Status: Allows you to filter result by their Job Statuses , Active or Passive
- Date Range: Allows you to filter list based on given date range by** last run time** or next run time. ** Dropdown select allows you to navigate between date types.**_
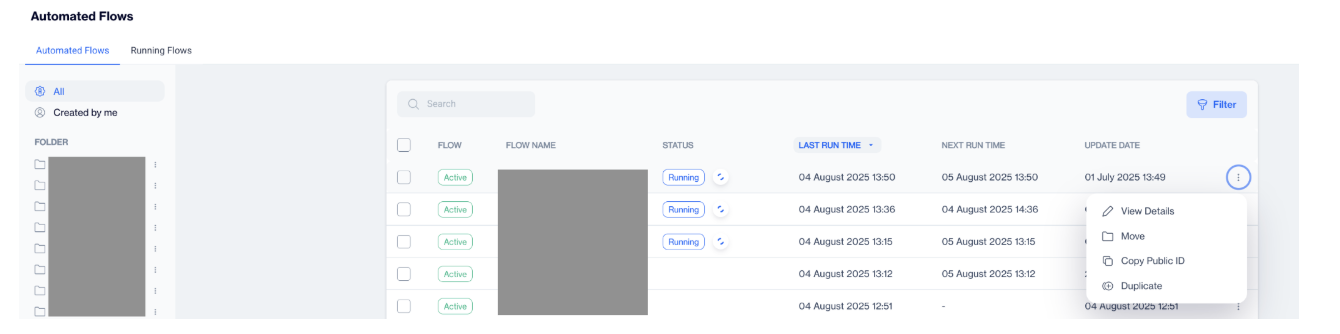
5.Actions:
- View Details: Allows you to view segment details. Investigating which filters or exlusions has been added harmonized with the given logic operands will be available with this action. Alternatively you can click on Segment Name to view its details.
- Move: Allows you to move selected Automated Flow to another folder.
- Copy Public Id: Public Id is for using REST API updates for the selected segment. This public Id will be use to updating segment audience via REST API.
6.Bulk Management: When you checked the boxes , this will allows you to Move selected automated flows to another folder.
Creating Automated Flows
Automated Flow, provided by Dengage, serves as an ETL (Extract, Transform, Load) tool designed to facilitate seamless integration beyond the traditional REST API options. This versatile tool enables comprehensive data management capabilities, including data importation, manipulation, and exportation, among others, allowing clients to efficiently handle various data operations with ease.
Triggers
Triggers in automated flows are designed to initiate a series of data-centric operations. They detect specific conditions or events, prompting the system to execute predefined actions that refine and leverage your data assets.
Recurring
Periodically evaluates your data sets to identify new opportunities or changes, ensuring your marketing efforts are always grounded in the most current data.
- Choose Frequency: Select how often you want the trigger to occur. Options typically include daily, weekly, monthly, etc. For instance, select 'Weekly' to trigger the workflow on specific days of the week.
- Select Recurring Days:
- If you've chosen Weekly, select the days of the week when the trigger should activate. For example, check Tuesday to run the trigger every Tuesday.
- Choose Monthly to trigger an event on a specific day each month, like the 1st, or on a relative day, like the first Monday of the month.
- Select Yearly to trigger an event on specific months, and on set days within those months, like the first Monday in January and July.
- Defining Daily Frequency:
- Single Occurrence: If you want the trigger to fire once on the selected days, choose 'Occurs once at' and set the time. For example, enter '09:00' to activate the trigger at 9 AM.
- Multiple Occurrences: If you need the trigger to occur multiple times throughout the day, select 'Occurs every' and specify the interval, such as '1 Hour'. Then set the 'Starting at' and 'Ending at' times to define the window during which the trigger should repeat.
- Finalizing the Setup:
- Review all settings to ensure they match your intended schedule.
- Click OK to save your Recurring Settings and implement the trigger into your automated workflow.
NoteThese settings ensure that your automated tasks are executed like clockwork, keeping your marketing efforts consistent and reliable.
File Drop
Detects the arrival of new data files, such as customer lists or transaction records, and automatically incorporates this data into your marketing ecosystem for immediate action or analysis.
- FTP User: Enter the FTP username provided to access the file directory.
- Directory: Select or specify the directory where files will be dropped.
- File Headers: Enter the headers expected in the file, matching the order of the columns.
- Encoding: Choose the file encoding, typically UTF-8 for compatibility.
- Zip: Check this if the file will be uploaded in a compressed format and provide a password if the file is encrypted.
- Delimiter: Choose the delimiter used in the file, or select 'Auto Detect' if unsure.
- Date Column Format: Choose 'Auto Detect' for the date format or specify a custom format if needed. **Use question mark to view Format Specifiers. **
- Fail Import: Specify a percentage of invalid data rows allowed before the file import is considered failed.
API Trigger
The API Trigger is designed for instantaneous interaction, allowing your data processes to be activated instantly when an associated event is communicated through the API. This trigger ensures your data ecosystem remains responsive and up-to-date in real-time.
Triggering Automated Flows Through APIFor an immediate response within your automated workflows, the API Trigger can be utilized:
To activate the configured automated flow, employ the TriggerAutomatedFlow endpoint and provide the Public ID of the flow.
Locating the Public ID
- Position your cursor over the desired API Trigger node within your flow.
- Click to reveal and then copy the Public ID directly to your clipboard.
With the Public ID, you can seamlessly integrate real-time data events into your flow, ensuring that your automated systems react promptly to the dynamic needs of your operations.
Actions
Actions are the steps taken once a trigger is activated. They are the mechanisms through which data is shaped, categorized, and made ready for strategic campaign deployment, ensuring that every communication is informed by accurate and actionable data insights.
Audience Builder
Crafts a detailed view of your target audience by segmenting users based on the latest data, allowing for personalized campaign strategies that resonate with each segment's unique attributes.
1.Define Audience
Begin by choosing how to create contact list for this audience builder.
- Create from File: This option is for creating a contact list from a file trigger, typically used when you have a prepared list of contacts in a file format. To activate this feature, you must add a 'File Drop' in the Triggers section of your automated flow setup.
- Create by Interactive Builder: Select and filter contacts using the platform's interactive filter editor. This method allows for dynamic audience creation based on specified criteria within the user interface. Subsequent steps will be detailed according to the selection made here.
- SQL query: If you prefer to use custom SQL queries to define your audience, this option enables you to write and execute your SQL against your data.
- Create from remote source: Choose this to import contacts from an external data source, pulling in audience information from outside your immediate database.
2.Select Audience Source
After selecting the method , next step is choosing your source of contacts Options include;
- All Contacts for targeting based on contact information or
- All Devices for targeting based on device usage.
3.Filter Audience
- Add Filter: Add specific criteria to narrow down your audience, such as "Users who did an Order event at least once in the last 30 days".
- Add Group: Combine filters logically to create complex audience segments.
- Apply Exclusion Filters (if necessary):
- Add Exclusion Filter: Exclude specific contacts or attributes from your audience.
- Add Exclusion Group: Exclude groups of contacts based on combined criteria.
Data Builder
Constructs robust data profiles and enriches customer segments, providing a granular foundation for precise targeting and message customization. On below you may find the configuration steps of the Data Builder.
Begin by opening the Data Builder action within your automated flow. This tool is essential for constructing a data table for later use, such as exporting or updating data spaces.
1.Choosing the Data Source
Decide how you want to create your data table. You can choose to:
- **Create from a File: **Import data from a file provided by a file drop trigger. To activate this feature, you must add a 'File Drop' in the Triggers section of your automated flow setup.
- Use an existing Table: Select from available tables within your system.
- Execute a SQL Query: Write a custom SQL query to specify the data you need.
- Import from a Remote Source: Acquire data from an external source.
2.Selecting or Creating a Table
- If using an existing table, select Tables and then choose from the list of available tables like
master_contact,master_deviceor any other previously created tables. - If creating a new table from the previously created steps within current automated flow, choose Tables from Automation and select the relevant source, such as Audience Builder.
3.** Defining Columns**
- Specify which columns you want to include in your data table. For instance, you might choose 'contact_key', 'whatsapp_number', and 'whatsapp_status' from the 'master_contact' table.
4.Finalizing Data Table
- Review the summary of your selections to ensure everything is correct. It should list all the contacts and columns you've included in the 'master_contact' table, for example.
- Confirm your choices and save the data table for later use within the automated flow.
Data Space Update
Keeps your data repositories updated by applying real-time changes, ensuring that every marketing decision is based on the latest customer information.
1.Selecting The Data Source
Begin by selecting the data source for the update. You can choose Audience Builder or **Data Builder **that created on previous steps
2.Choosing The Target Table
- Select the target data table where the update will occur. This could be a specific table like sendable tables or another table within your system. Also It's available to select
master_contactormaster_devicetables.
3.** Mapping Columns & Setting Import Action**
- **Choose the import action **that best suits your needs. Based on the Table Types this available import actions may vary , you can check all available option from the list below.
Available Data Table Actions
- Insert: Adds new rows to the table with the data provided. Does not modify or delete existing rows.
- Update: Modifies existing rows in the table based on a key that matches rows in the source to the destination. It does not add new rows.
- Upsert: A combination of insert and update. Adds new rows and updates existing rows by matching a key.
- Delete: Removes rows from the table that match the criteria specified in the source data.
- Truncate: Removes all rows from the table, effectively resetting the table.
- Truncate and Insert: Empties the table of all current data (truncates) and then inserts new data from the source.
- Append: Adds new rows to the end of the table without altering existing rows.
- Merge: Combines rows from the source data into the table, based on matching keys, and updates or inserts accordingly.
- Replace: Deletes the existing table and replaces it with new data, similar to a drop and recreate operation.
- Refresh: Updates the data in the table by completely replacing it with the data from the source, often used when the entire dataset needs to be refreshed rather than just incremental changes applied.
These actions are utilized to manage the state of the data within tables during automated processes, such as ETL (Extract, Transform, Load) operations, data synchronization, or batch processing tasks. The availability and exact behavior of these actions can vary depending on the specific database or data management tool you are using.
- Map the columns from your source (like 'ID' or 'KEY') to the target columns in the destination table (such as 'contact_key' or 'whatsapp_number'). Ensure that the data types match and that any necessary conversions are specified.
- If needed, select the option to overwrite empty values. This will replace any null or missing data in the target table with the information from your source data.
4.** Review and Confirm**
- Review the summary of your settings, including the source, target table, and mapped columns. Confirm that all details are correct before proceeding.
- Once you've verified the configuration, click OK to confirm your settings.
Data Export
Moves data seamlessly to external systems or data lakes, enabling cross-platform analysis and broader data utilization across marketing tools.
1.Select Data Source
You can choose to export data from various sources within your data platform. The options available are:
- Table: Use an existing table as your data source.
- Segment: Use a predefined segment for targeted data export. Subsequent steps will be detailed according to the selection made here. The processes for the other options are quite similar.
- SQL Editor: Write custom SQL queries to select specific contacts.
- Permission Change Logs: Export logs that track changes in permissions.
- Incremental Logs: Export logs incrementally. This option works well with recurring triggers and can be set to frequencies like "occurs once" or "occurs every" with a minimum occurrence time of 15 minutes.
2.** Choose the Segment/Table**
- After selecting Segment as your data source, you’ll see a list of previously created segments and system predefined segments. **Choose the one that fits your export criteria. **
3.Select Columns
- Determine which columns from your selected segment you wish to export. You may have options like
contact_key,whatsapp_number, and others. Check the boxes next to the columns that you want to include in your export.
4.Select Remote Target
Diverse Requirements for Different Platforms/ProductsPlease be aware that data export requirements can differ depending on the platform or product you have selected. It's crucial to understand these variations to ensure successful data transfer. Below, we provide a comprehensive list of platforms along with the specific requirements needed to define each as a Remote Target.
| Platform/Protocol | Requirements | Available Options |
|---|---|---|
| FTP | Host , port, User Name, Password, Remote Directory | ZIP Compression, Use Passive Mode |
| SFTP | Host , port, User Name, Password, Remote Directory, SSH Key | ZIP Compression |
| FTPS | Host , port, User Name, Password, Remote Directory | ZIP Compression |
| Google BigQuery | Key Json File | |
| Microsoft SQL | Server, port, Database Name ,User Name, Password | |
| Facebook Custom Audience | User Id, Account Id | |
| Google Customer Match | Ad Account Id , User | |
| SalesForce | SalesForce Client Id, SalesForce Client Secret Key. ⚠️ A column name from Master Contact table should be selected | |
| Turkticaret.net | Api Key, Segment Api Key | |
| Turk Telekom | User Name, Password, Segment Api Key | |
| Web API | Base URL, Endpoint, Authentication Type | Enable HTTP/2 (Default 1.1) , Enable compression (gzip) |
| AWS S3 | Bucket Name, Region, Access Key, Secret Key | |
| Oracle | Server IP, port, Database Name, User Name, Password | |
| TikTok | Advertiser Id, Advertiser Name | |
| Amazon Redshift | Server, port, Database Name ,User Name, Password |
4.** Review Settings & Approval**
- Review your export settings, including the source, target type (like FTP), target name, file name (often with a timestamp for uniqueness), and other file parameters like delimiter, encoding, and date format. Ensure that all the details are correct.
- Once everything is confirmed, Save your settings
Update Tag
Dynamically adjusts tags on customer profiles, reflecting new behaviors or status changes, to maintain up-to-date segmentation for subsequent campaigns.
Important NotesThis feature is available for steps that include the Audience Builder. Essentially, it updates tags for the audience within the automated flow.
Difference Calculation
Analyzes and maps variances in data over time, offering insights into trends and patterns that can inform future marketing strategies and optimization.
1.Selecting Source Table
- You will see a list of available tables. Select the Source Table by clicking on it. This will be the table you want to compare against another to find differences.
2.Selecting Destination Table
- After selecting the source, proceed to select the Destination Table. This is the table you want to compare your source table with.
- Click on the destination table from the listed options.
3.Mapping Columns for Difference Calculation
- Now, map the columns from your source table to the destination table. Ensure that the columns you're comparing are of the same data type and correspond to each other correctly. Columns may be ignored. It is not necessary to map every column. This allows for selective data integration based on relevant fields only.
4.Reviewing and Saving the Configuration
- After you have mapped all necessary columns, a summary of your configurations will appear. Review this summary to ensure all mappings are correct.
- Click 'Save' to finalize the difference calculation setup.
5.Resulting Actions
- Once the difference calculation is saved, it will create nodes for the next step that will be used to update the data space based on the calculated differences.
- You will see the resulting actions like 'Data Space Update 1' and 'Data Space Update 2' indicating that the flow has proceeded as intended.
Wait
Introduces a strategic pause between data operations, ensuring that subsequent actions are triggered at the most opportune time for data processing or campaign activation.
The Wait node comes with two configuration options:
Duration: This setting allows you to specify a wait period. Use the dropdown menu to select the unit of time—minutes, hours, or days— and input the duration of the wait. This creates a controlled pause within the journey flow, giving your audience time to interact with the initial message before proceeding to the next step.
Wait Until: For more precise scheduling, you can choose to wait until a specific calendar date. This ensures that the next step in your campaign aligns with particular events or milestones.
Fire Campaign
Acts as the bridge between data management and communication, enabling you to launch targeted campaigns based on the refined data conditions and insights garnered from the preceding actions.
Availability of Recurring CampaignsPlease note that this feature is applicable exclusively to previously established and published Recurring Campaigns. Only such campaigns are eligible for selection and execution within this feature set.
Setting Up Recurring Campaigns and Audience Selection
- Choose a Recurring Campaign: Identify and select the Recurring Campaign you intend to activate from the available list of previously published campaigns.
- Define the Audience: Select an Audience Builder that has been previously configured to define the recipients of the campaign.
- **Confirm Your Settings: **After confirming that the campaign and audience selections are correct, click 'OK' to save your configuration and proceed with the campaign initiation.
Duplicate the Automated Flow
The Duplicate feature allows you to quickly create a new automated flow by duplicating an existing one. This saves time and ensures consistency, as the duplicated flow retains the structure and configurations of the original flow, while allowing you to modify details as needed.
How to Access
- Go to Data Space > Data Management > Automated Flows.
- On the Automated Flows listing page, you will see:
- Flow Name
- Status
- Last Run Time
- Next Run Time
- Update Date
- At the end of each listed flow, click on the three dots (⋮) menu.From the three-dot menu (⋮) of your chosen flow, click on Duplicate.
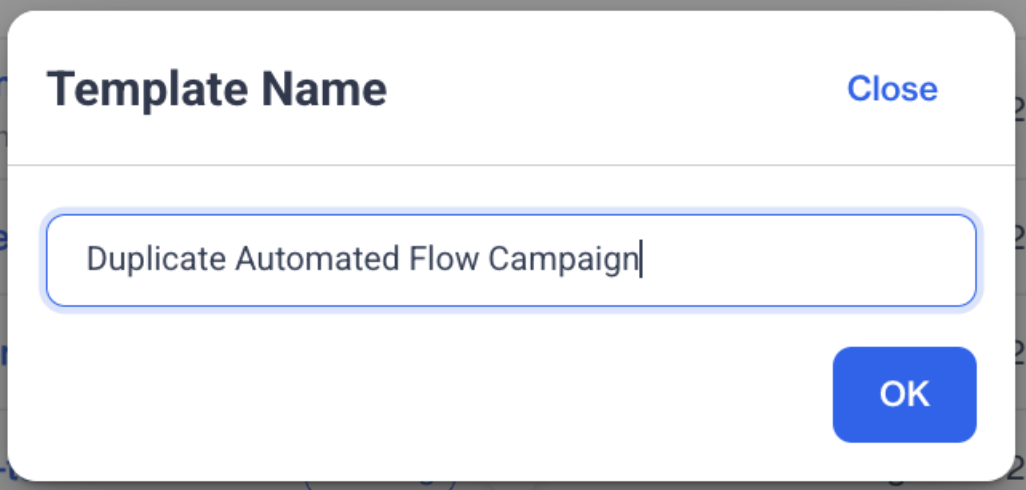
- A Template Name modal will open:
- The name field will include the original flow name plus “-copy”.
- Rename your duplicated flow if desired.
- Click OK.
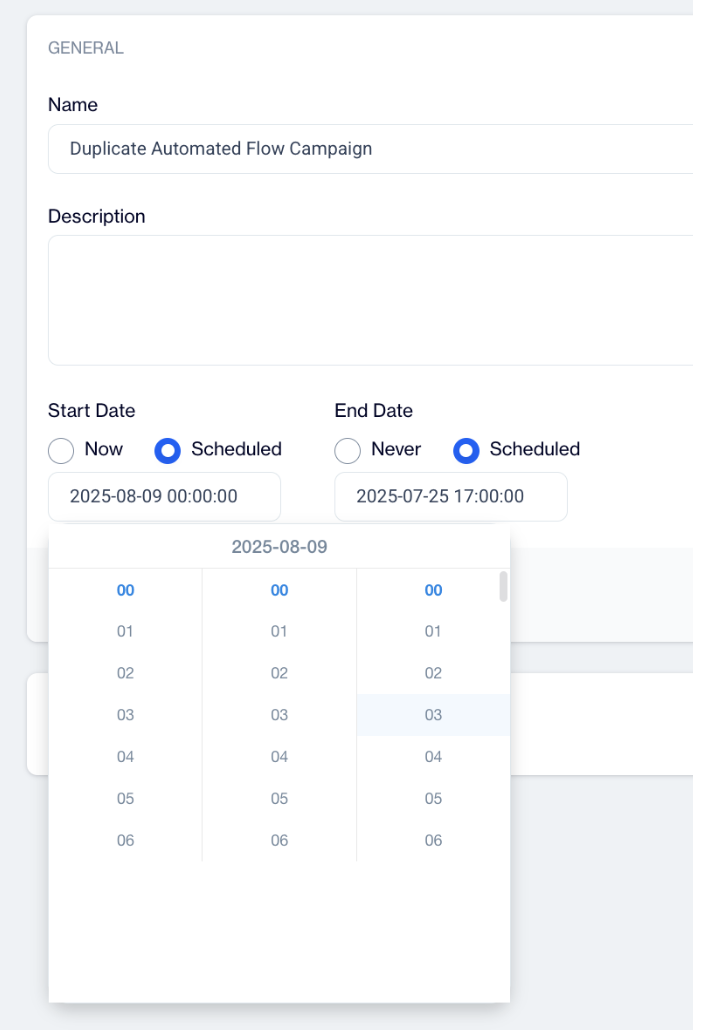
Configuring the Duplicated Flow
After clicking OK, you will be redirected to the General Section, where you can review or update the name of your duplicated flow. You also have the option to choose a folder, add a description, and adjust the start and end dates (which are inherited from the original flow). Once you have made the necessary updates, click Next.
In the Flow Screen, you will see the original campaign’s flow structure. Here, you can make changes if needed by adding new nodes or deleting any unwanted nodes. After finalizing the flow adjustments, click Next.
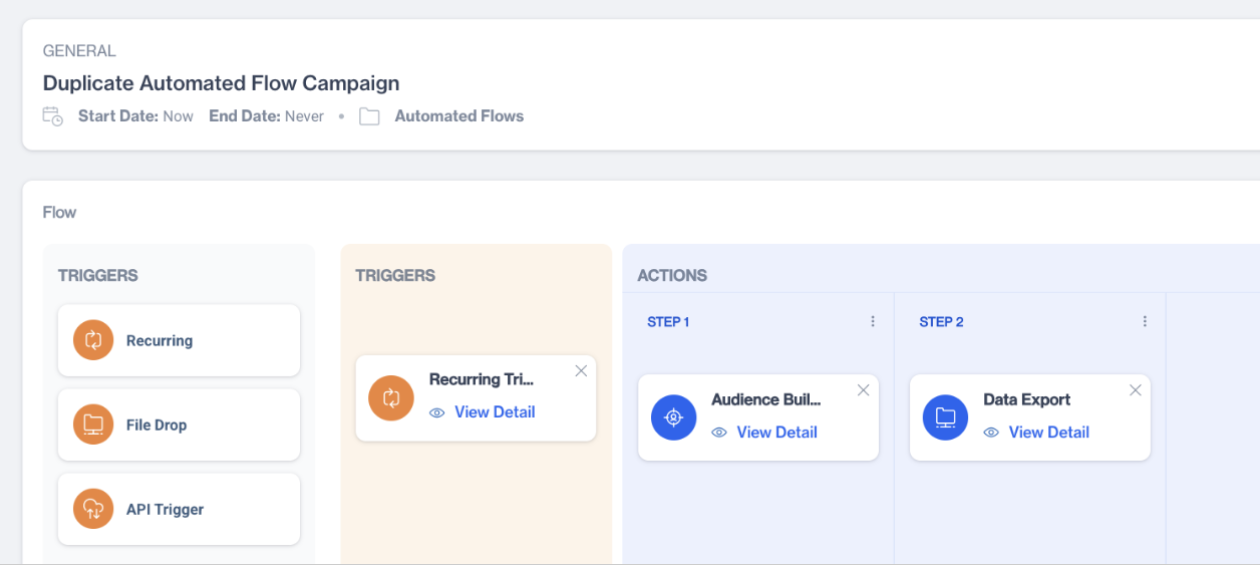
On the Automation Information Screen, review all the details of your flow, including the name, start date, triggers, and actions. Ensure everything is correct and then click Save to finalize and create your duplicated flow.
Related Articles
Automated Flows
In which situation do I get an error on an automated flow which exports the data to Facebook? Errors in an automated data export flow to Facebook can occur for several reasons. These include the Meta link timed out, broken connection , or if Facebook ...Automated Flows History
The Automated Flows History section provides a comprehensive history of automated flows, enabling users to track the execution and scheduling of these flows. This feature ensures easy access to past and upcoming flow runtimes for monitoring and ...Exporting Data to MySQL via ODBC in Automated Flows
The ODBC integration in Dengage allows users to export data from the Automated Flow module to various database systems, including MySQL.With the latest enhancements, users can now export data directly to their MySQL databases by defining an ODBC ...Automated Sendable Contact Import
The Automated Sendable Contact Import feature lets you automatically create a new, dynamic sendable contact table every time a file is uploaded. This is different from a regular Automated Flow, which can only update existing tables. With Automated ...Automated Flow - Data Export to Google BigQuery for Segment/Table
The Campaign Control Group Contacts log type is now available under Incremental Logs, allowing users to export detailed control group data used in campaigns. This enhancement supports transparency and auditability by providing direct access to ...